Let's learn to transform how you edit images with Photoshop's powerful AI tools that make complex tasks simple.
Introduction
Adobe introduced AI capabilities to Photoshop in 2023, marking the biggest change to how the platform’s users edit images in over a decade.
These AI features run on Adobe Firefly, Adobe's family of generative AI models. But unlike other gen-AI image generators, Photoshop AI is unique, because it:
Is integrated into Photoshop tools directly
Was trained on licensed and public images only
Firefly powers the intelligent algorithms behind Photoshop's smartest tools. The technology was trained exclusively on licensed Adobe Stock images, openly licensed content, and public domain material.
Every major update since 2023 has expanded these AI capabilities, as Photoshop continued to add new AI tools or improve the old ones. In this article, we will learn about:
Photoshop AI Generative Fill
Photoshop Neural Filters
Select Subject & Sky Replacement
Object Selection Tool
With that out of the way, let’s explore each of them and learn what they do, how to use them, and when to use each.
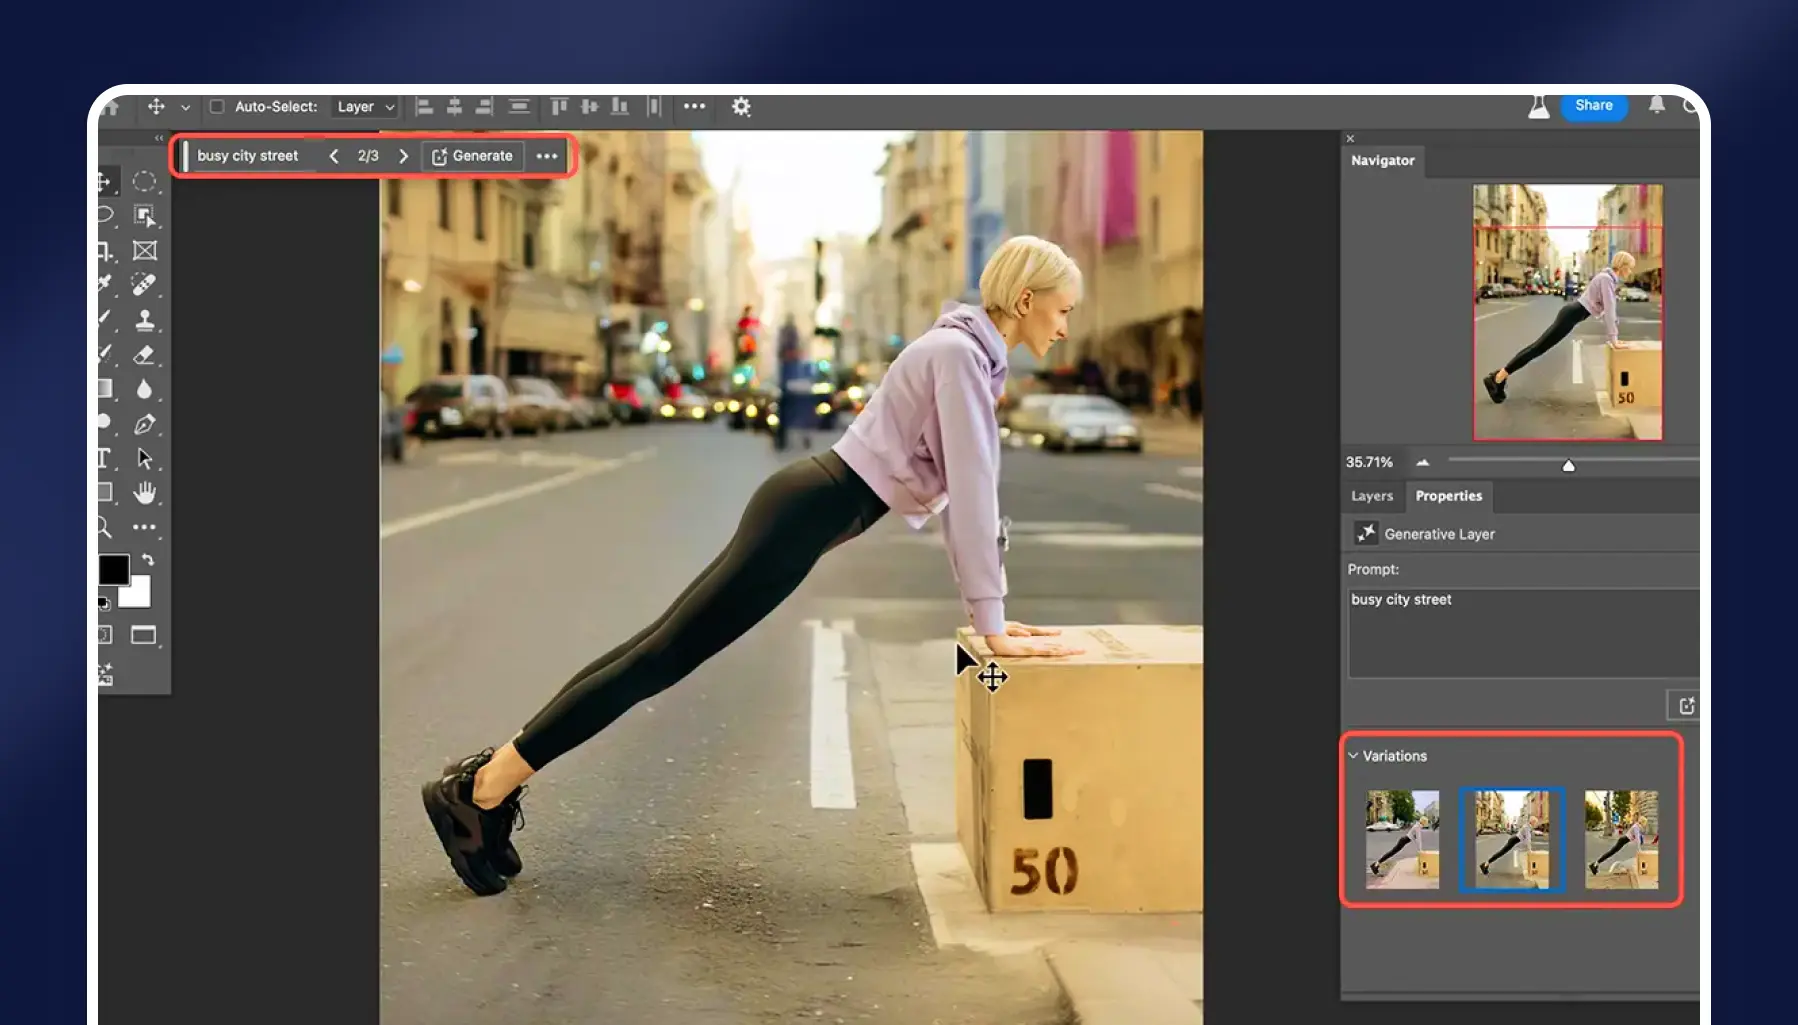
Make a selection using any selection tool (Lasso, Marquee, or Object Selection Tool)
Click the Generative Fill button that appears in the Contextual Task Bar below your image
Type a description of what you want to add, or leave blank to remove the selected area
Click Generate to create three variations of your edit
Choose your preferred result from the Properties panel, or generate new options
Refine your selection if needed by adjusting the mask on the generated layer
Blend the results using opacity, blending modes, or additional adjustments as needed
How to remove objects: select the area and leave the text prompt empty. Photoshop will intelligently fill the space with surrounding pixels.
How to add elements: To add an object, write something in the textbox. Photoshop recommends omitting verbs and directions.
❌Add a red sports car.
✅ red sports car.
How to extend the canvas: use the Crop Tool to expand your image borders, then select the empty areas and generate without a prompt.
What are Photoshop Neural Filters?
Neural Filters add AI-powered effects to your images. You can use them to change the style and look.
They live in a dedicated workspace where you can combine multiple filters and preview results in real-time.
Each filter specializes in a specific type of enhancement.
Skin Smoothing removes blemishes.
Smart Portrait adjusts facial features and expressions.
Style Transfer applies artistic looks from famous paintings to your photos.
The Colorize filter brings black-and-white photos to life with historically accurate colors.
Landscape Mixer blends different scenery into your existing images.
Super Zoom enhances resolution when enlarging images beyond their original size.
Neural Filters work non-destructively on Smart Object layers. This means you can adjust or remove the effects at any time. The filters also remember your settings, making it easy to apply consistent looks across multiple images.
How to Use It
Open your image and convert it to a Smart Object (right-click layer > Convert to Smart Object)
Go to Filter menu > Neural Filters to open the dedicated workspace
Browse available filters in the sidebar - some require downloading before first use
Toggle on a filter by clicking the switch next to its name
Adjust the sliders to control the intensity and specific parameters of each effect
Preview changes in real-time as you move the sliders
Stack multiple filters by enabling several at once for combined effects
Click OK to apply the filters as a Smart Filter layer
The workspace shows your original image on the left and the filtered version on the right. Use the zoom and hand tools to examine details while adjusting.
What are Select Subject & Sky Replacement?
Select Subject instantly identifies and selects the main element in any photo. The tool recognizes people, animals, vehicles, and objects without any manual input.
Sky Replacement automatically detects the sky in landscape photos and swaps it with your choice.
How to Use It
For Select Subject:
Open your image in Photoshop
Click Select in the menu bar > Subject (or use the Select Subject button in the Options bar)
Wait a moment while Photoshop analyzes and creates the selection
Refine the selection using Select and Mask if needed for perfect edges
Apply your edits - change background, add effects, or create masks
For Sky Replacement:
Open a landscape photo with visible sky
Go to Edit > Sky Replacement
Choose a preset sky from the dropdown menu or import your own
Adjust the sliders:
Shift Edge: refines the horizon line
Fade Edge: softens the transition
Sky Adjustments: modify brightness and temperature
Foreground Adjustments: match lighting with new sky
Toggle options like Flip Sky or Foreground Lighting as needed
Click OK to apply the new sky as grouped layers
The Sky Replacement creates an editable layer group. You can fine-tune the mask, adjust individual layers, or swap the sky again later.
What is the Object Selection Tool?
The Object Selection Tool allows you to select any element by drawing a rough selection around them. The AI then snaps to the exact edges automatically.
The tool offers multiple selection modes:
Rectangle mode works best for isolated objects with clear boundaries
Lasso mode handles irregular shapes and overlapping elements
You can also hover over objects to see AI-detected regions before clicking.
Blue overlays show what the AI recognizes. This works for people, cars, buildings, furniture, products, or any distinguishable element.
How to Use It?
Select the Object Selection Tool from the toolbar (press W to cycle through selection tools)
Choose your selection mode in the Options bar — Rectangle or Lasso
Hover over your image to preview AI-detected objects highlighted in blue
Draw around your target object — be rough, the AI will snap to precise edges
Add to your selection by holding Shift and selecting additional objects
Subtract from selection by holding Alt (Option on Mac) and drawing over unwanted areas
Fine-tune edges by clicking Select and Mask in the Options bar
For complex scenes, use the Object Finder option in the Options bar. This shows all detected objects at once, letting you click to select individual elements.
You can combine multiple objects into one selection by Shift-clicking each one.
How to Use AI in Photoshop Effectively
Now that we understand what each of the tools do and how to apply them, here are a few best practices and tips that will help you get the most out of them.
1. Work with high-resolution images
AI tools perform better with more pixel data to analyze. Blurry or low-quality sources limit the AI's ability to generate realistic results.
2. Keep prompts short
Photoshop’s tools have developer pre-prompts that tell them what to do. If you give them more directions like add, insert, remove, it might confuse the tool.
When you want to remove an area, leave the prompt blank
When you want to add something, write a description of that object
3. The shape and size of your selection matters
Draw selections that match the proportions of what you're adding.
A tall, narrow selection produces a tall object
A wide selection creates a wide object.
In terms of size, it’s best to work at 1024 pixels or smaller for best quality. Generative Fill struggles with larger dimensions. One way to achieve that is to generate in steps.
When it comes to Select Subject, it works best for prominent elements, while the Object Selection Tool handles specific items in busy scenes. Finally, Sky Replacement only needs scenes with visible sky, and you don’t have to select anything when using this tool — it detects and masks skies automatically.
4. Save successful prompts in a text document
Building a library of prompts that work well speeds up future projects. Note which descriptions produce the best results for common objects like skies, vehicles, or vegetation.
There are some things Photoshop's AI struggles with, so it’s best to avoid using it for these purposes. If you need one of the things listed below, there’s a better Photoshop alternative, which we’ll talk about later.
Generating large elements. The maximum generation size is 1024x1024 pixels
Generating humans. Hands, faces, and complex patterns — such elements often come out looking junky
Generating text. numbers and letters can look weird, and words often turn into gibberish.
Photo merging. Photoshop can't merge two uploaded images automatically.
Copyright content. The AI won't generate Nike swooshes, Disney characters, or brand-specific designs. For this, you can try Seedream AI, though it also may refuse your request.
Doing two things with one generation. Photoshop AI can't interpret multiple complex instructions in one prompt and make many complex edits, however, Nano Banana can.
Turn images into videos. Photoshop's AI won't animate or create video content, like Kling, Sora 2, or Veo 3.
Best Photoshop AI Alternative: Overchat AI Image Generator
Overchat AI Image Generator creates and edits images through simple text commands. The web-based tool runs directly in your browser without downloads or installations.
Best of all, you can use it completely free.The free plan includes:
Daily generation credits
Full resolution exports
No watermarks
Access to all filters
In terms of features, it has everything that Photoshop offers, and more:
✅ Choose from the best, most moder image feneration models
The interface is very simple — if features only what you need: an upload area, a text box, and a generate button. You can achieve professional results learning to use pro-software.
Frequently Asked Questions (FAQs)
What is Photoshop AI Generative Fill?
Generative Fill is an AI-powered tool that adds, removes, or replaces parts of images using text descriptions. It analyzes surrounding pixels to create seamless edits that match your image's lighting, perspective, and style.
Is Photoshop AI free?
No. Photoshop requires a Creative Cloud subscription starting at $21 per month. Adobe offers a 7-day free trial to test all features including AI tools.
How can I use Photoshop AI Generative Fill?
Make a selection, click the Generative Fill button in the Contextual Task Bar, type what you want to add (or leave blank to remove), then click Generate. The tool creates three variations you can choose from.
What version of Photoshop has AI?
AI features are available in Photoshop 2024 (version 25.0) and newer. Generative Fill launched in September 2023. Neural Filters arrived earlier but continue expanding with updates.
How can I use AI in Photoshop?
Access AI features through the Filter menu (Neural Filters), Edit menu (Sky Replacement, Generative Fill), and Select menu (Select Subject). The Object Selection Tool in the toolbar also uses AI.
What is Adobe Firefly?
Adobe Firefly is the generative AI model that powers Photoshop's creative features. It was trained on licensed Adobe Stock images and public domain content. You can also use Firefly standalone at firefly.adobe.com.
What are the best Photoshop AI tools?
Generative Fill excels at content creation and removal. Neural Filters perfect portraits and apply artistic effects. Select Subject saves hours on complex selections. Sky Replacement transforms landscape moods instantly.
How much does Photoshop AI cost?
Photoshop AI features are included in the standard Creative Cloud subscription. Individual Photoshop plans cost $21 monthly. The full Creative Cloud suite costs $55 monthly.
What is the best Photoshop AI feature?
Generative Fill is the most versatile AI feature. It handles object removal, image extension, and content creation in one tool. The non-destructive editing and multiple variations make it invaluable for any workflow.
How can I download Photoshop AI?
Sign up for Creative Cloud, then download Photoshop through the Creative Cloud desktop app. Install from the Apps tab. AI features are built into the latest version - no separate download needed.