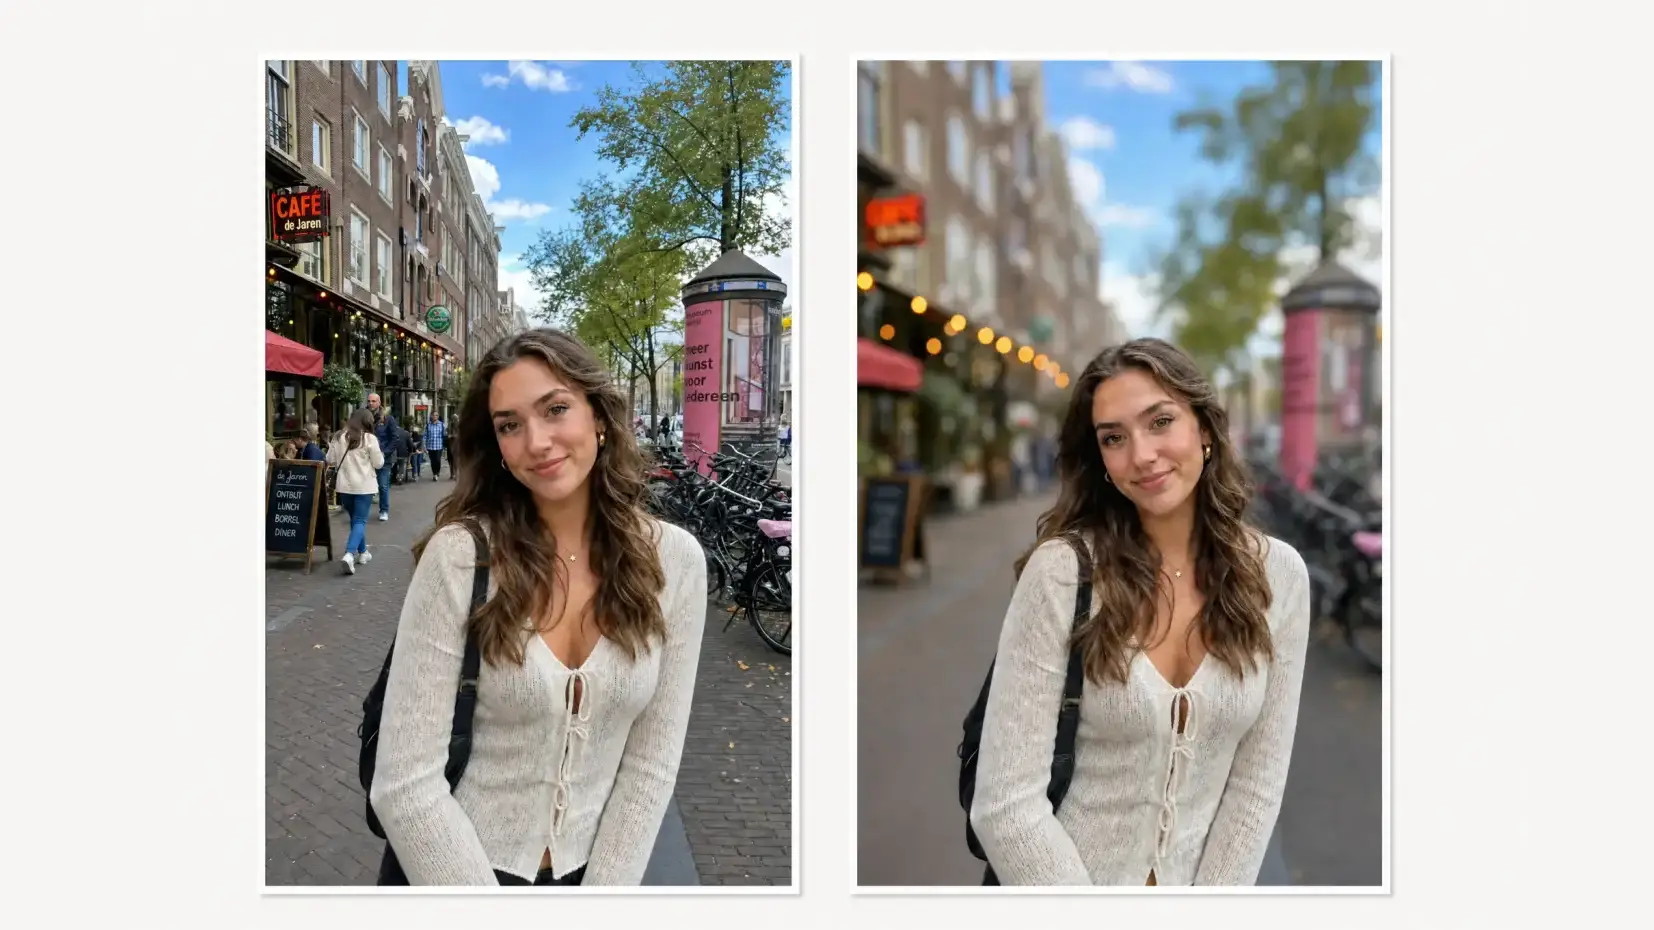
In this article you'll learn how to blur the background of an image with the Overchat AI background blur filter.
Overchat AI background blur is an AI-powered online tool that adds realistic bokeh to your images, and it's much easier to use than Photoshop while giving more realistic results. Let us show you.
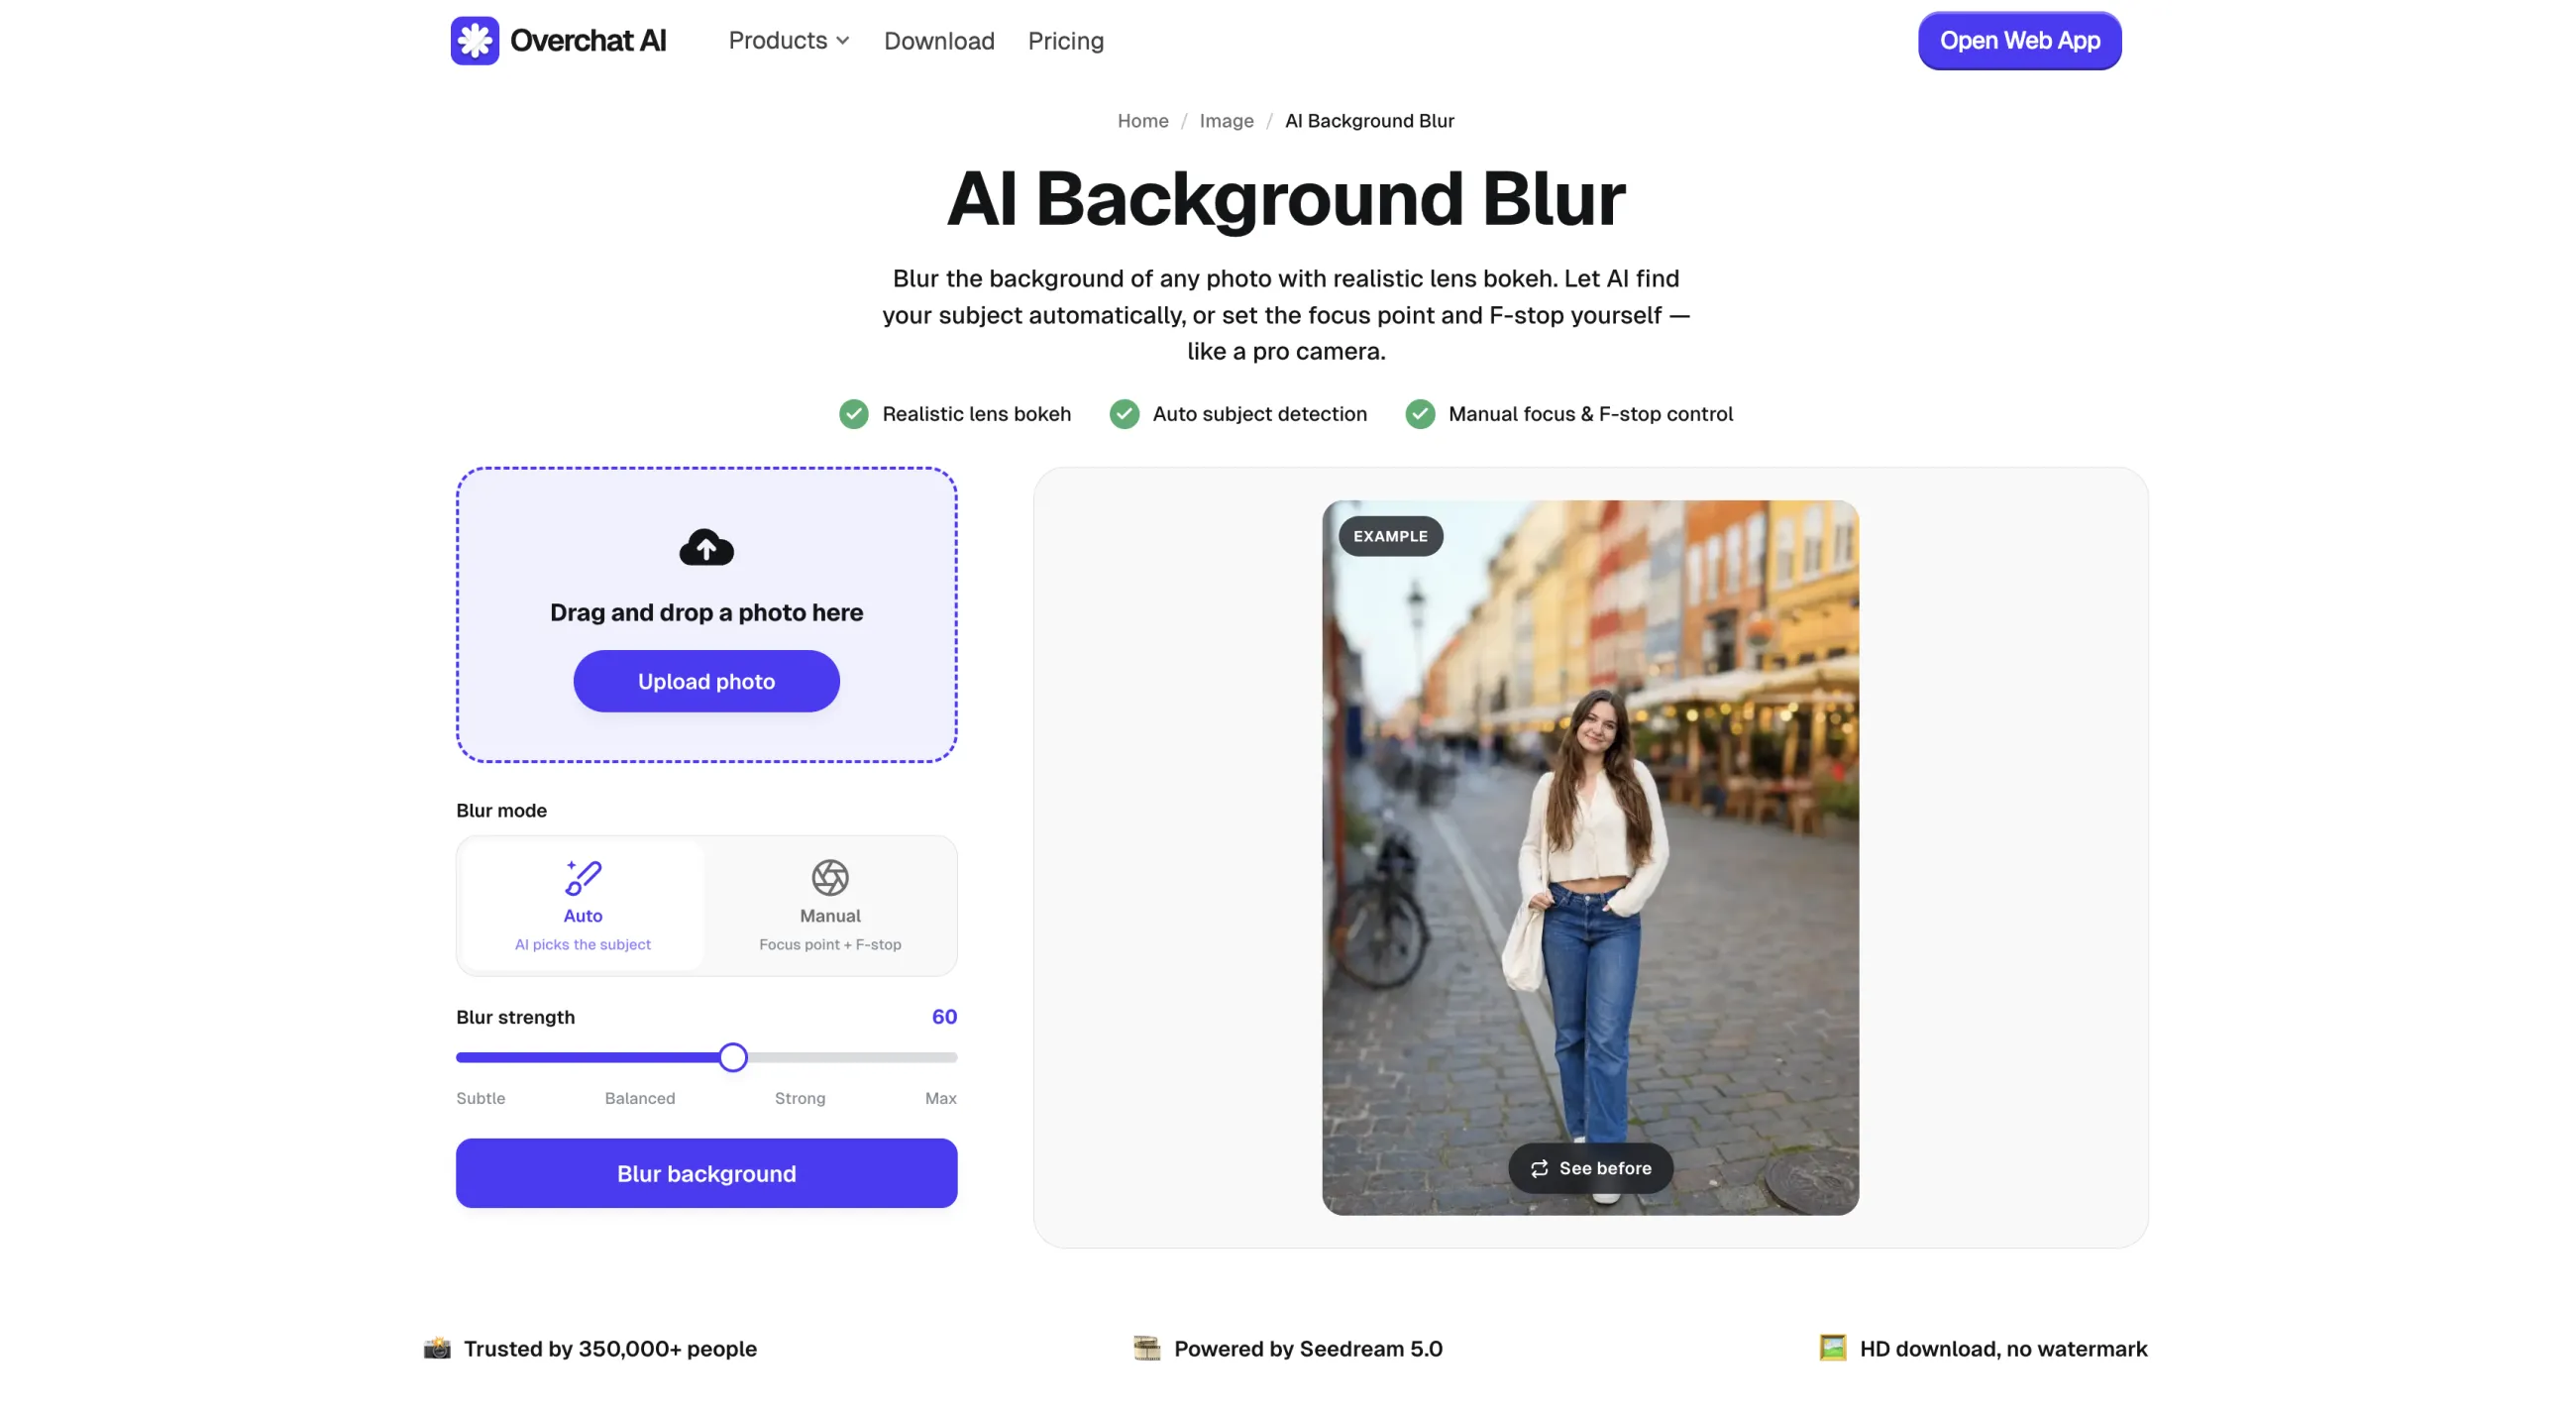
Use Auto if the main subject is obvious and you want the tool to choose it.
Use Manual if you need to set the focus point yourself.
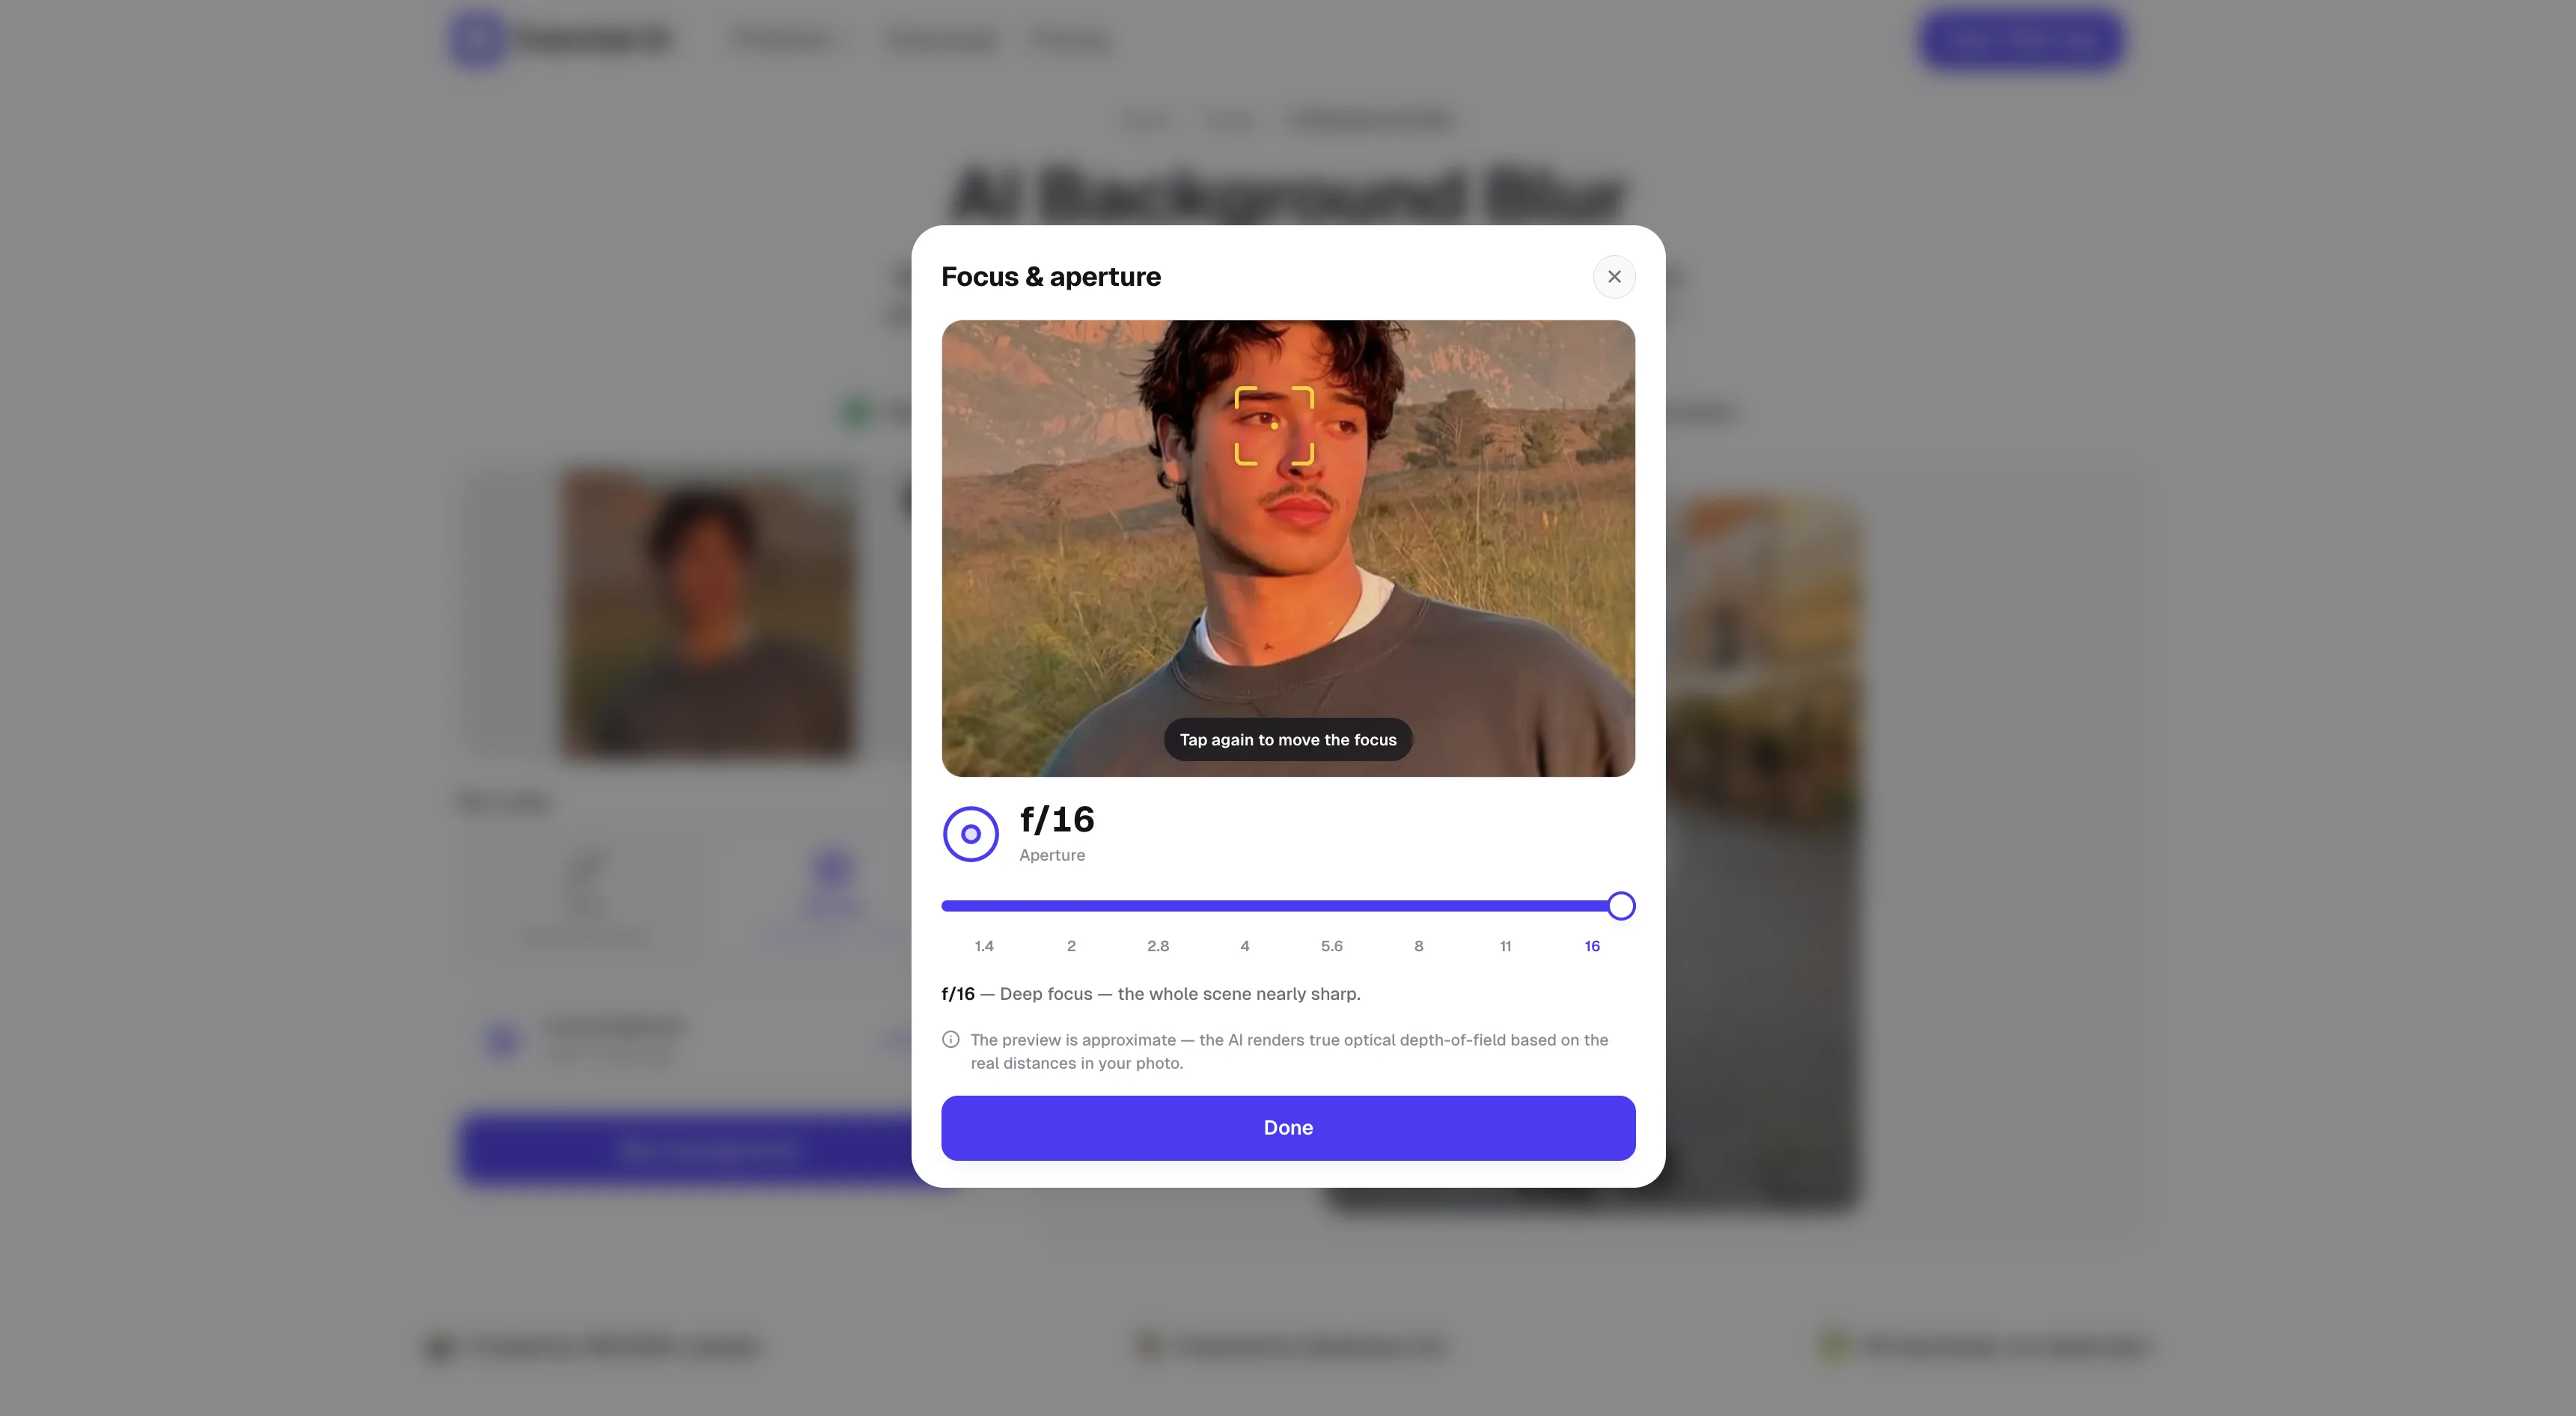
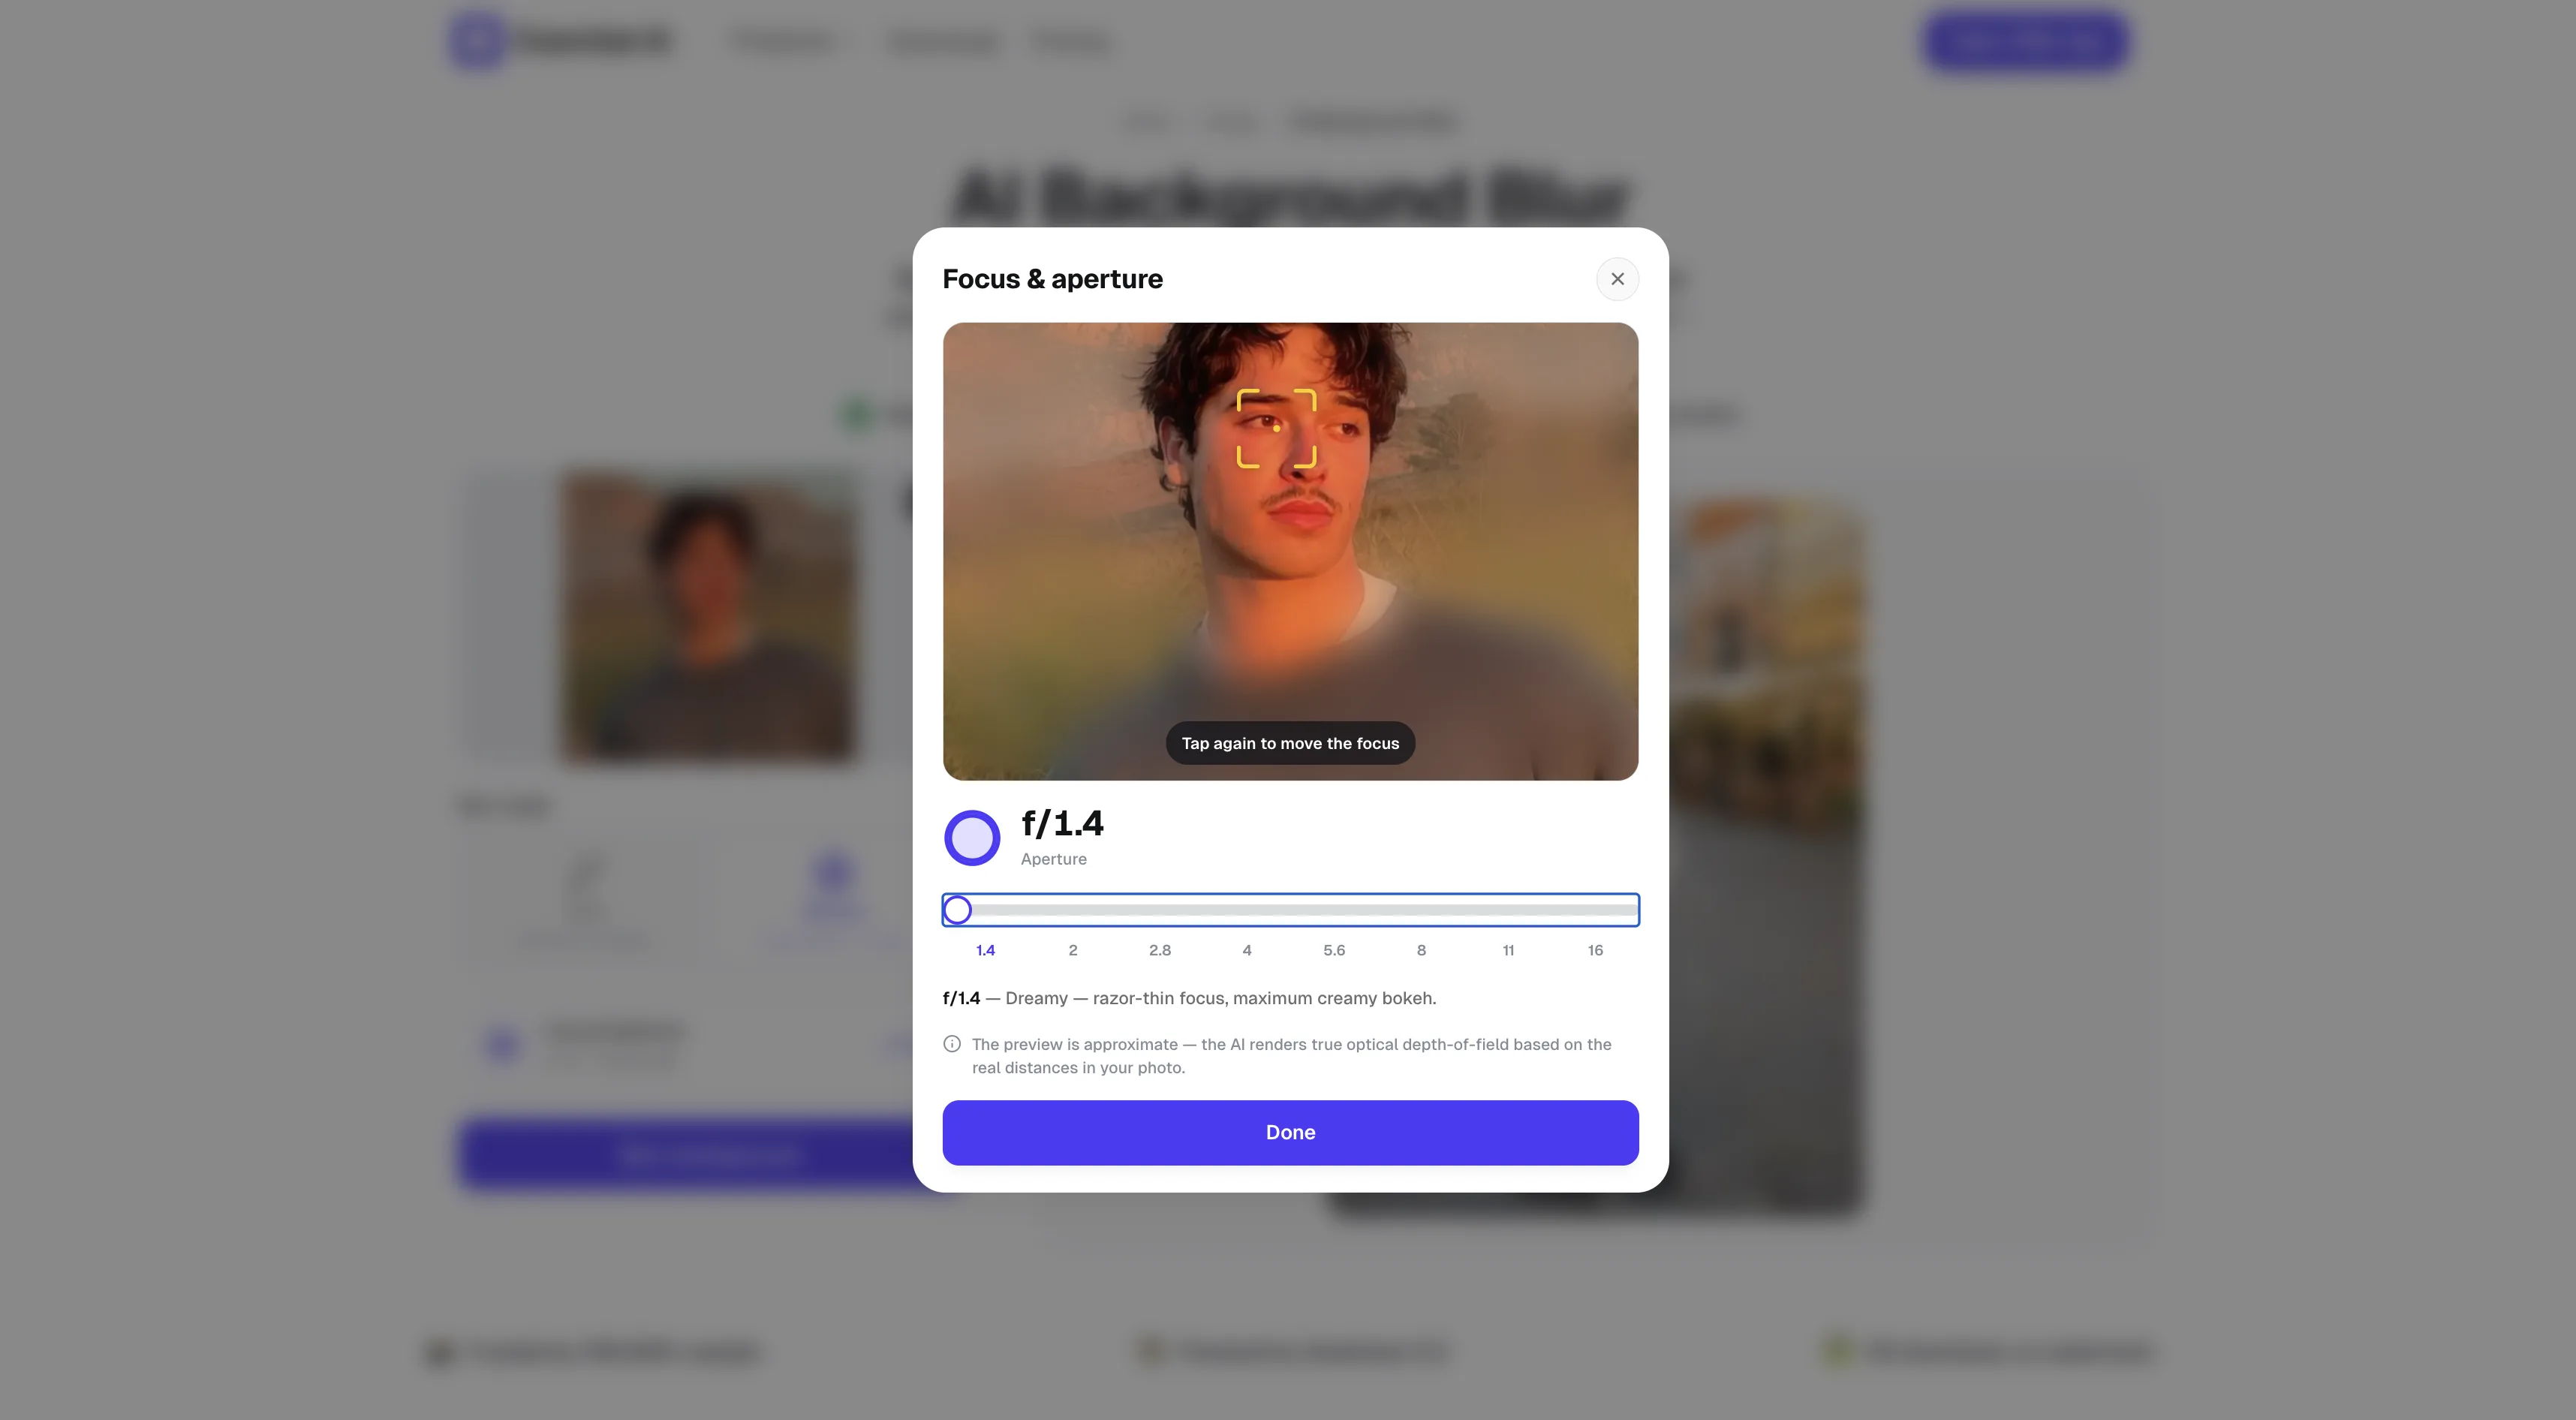
If you use Manual mode, select an F-stop to control the amount of blur. A lower F-stop such as f/1.4 produces a stronger background blur. A higher setting such as f/16 keeps more of the scene sharp.
Press or tap Blur background and wait for the image to process, then simply download the result.
Done — you've just blurred your photo online with AI. But let us explain exactly what happened behind the scenes and walk you through the interface step by step.
How does the Overchat AI background blur work?
AI background blur is a computational photography technique that reproduces the shallow depth of field normally created by a camera and lens. Real optical blur isn't uniform. Objects near the plane of focus appear sharp, while objects farther in front of or behind it become progressively softer.
A standard blur filter has no idea how near or far objects are. Because it doesn't understand these spatial relationships, it simply blurs whatever area or mask it is given. An AI-assisted system, however, such as the Overchat AI background blur tool, can instead use an estimated depth map or subject mask to vary the strength of the effect across the image.
To do this, the AI first separates the subject and masks it, then estimates depth and draws in new pixels in the areas that need to be blurred, realistically reproducing the effect.
You can use this to create more subject-background separation after the fact, for example, in portraits, wildlife photography, or product photography. And, best of all, no matter what kind of equipment you used, you can easily make any image look like it was taken with an exotic prime telephoto lens that costs tens of thousands of dollars.
How to blur the background of an image with AI: step by step
Here's the full walkthrough, from opening the tool to downloading the finished image.
1. Open the AI Background Blur tool
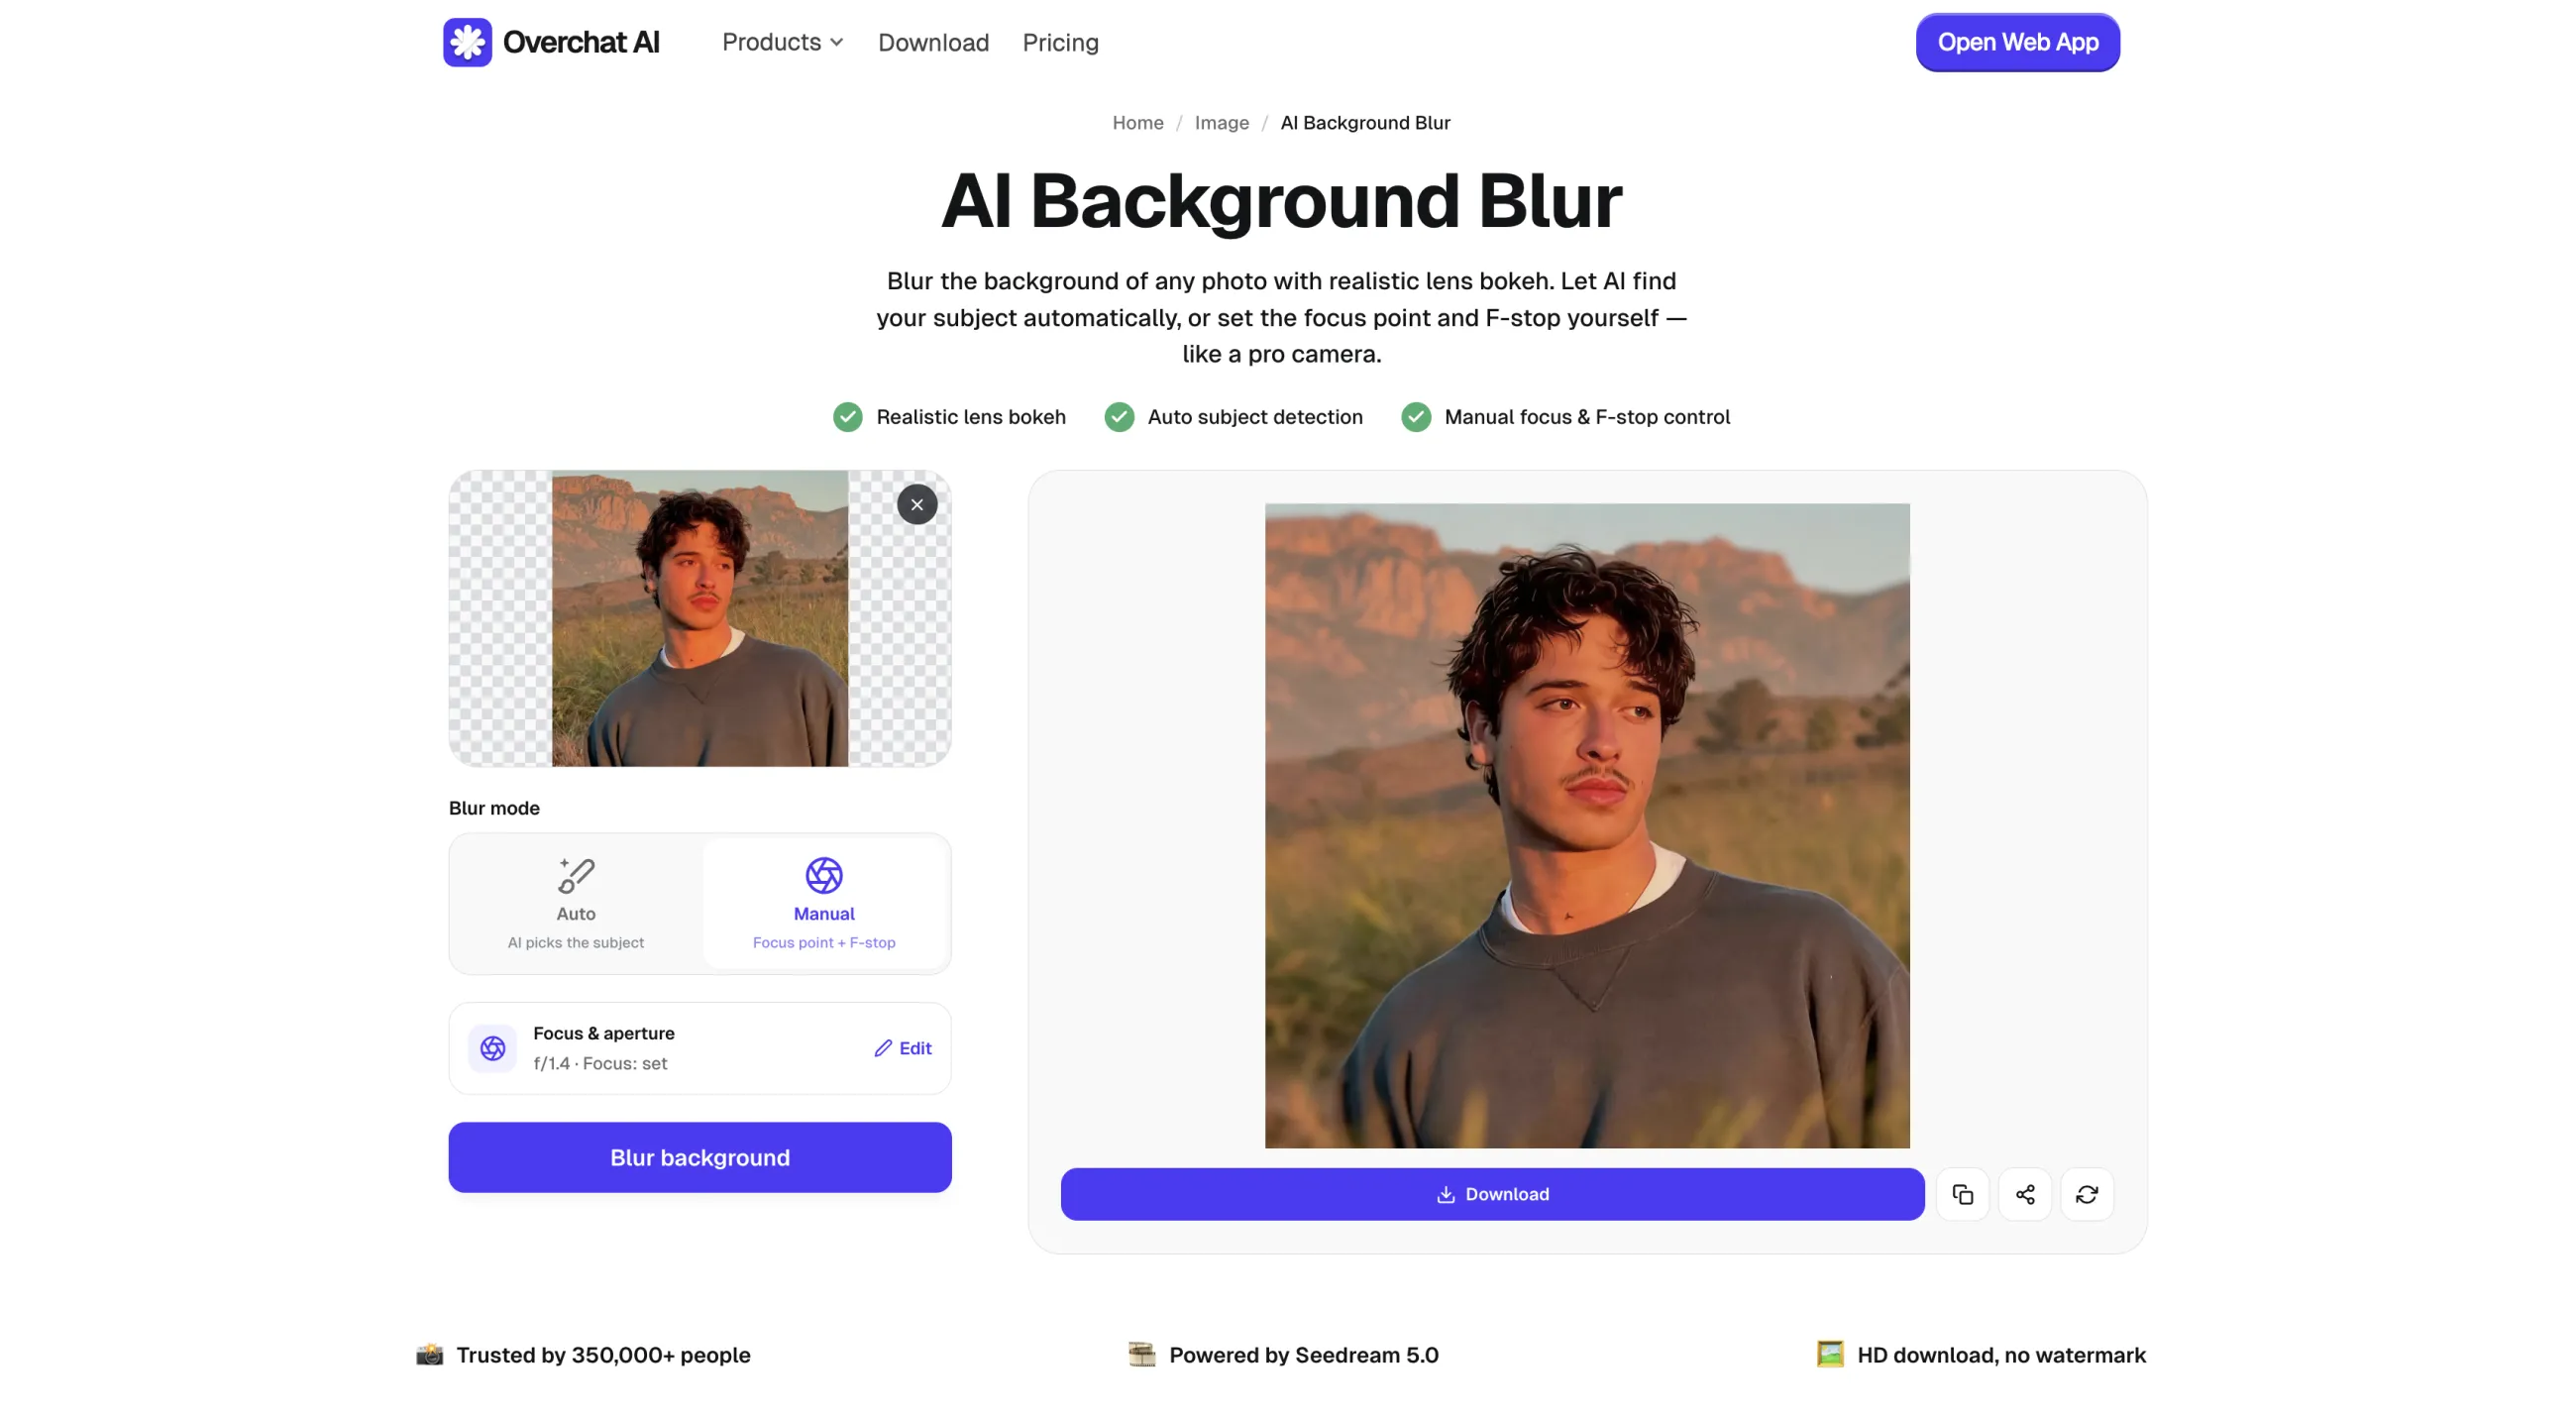
Open AI Background Blur in your browser. You'll see the editor on the left and an example image on the right.
Open the AI Background Blur tool.
Note: Overchat AI background blur is an online app, so you don't have to install anything on your system to use it.
2. Choose Auto or Manual mode
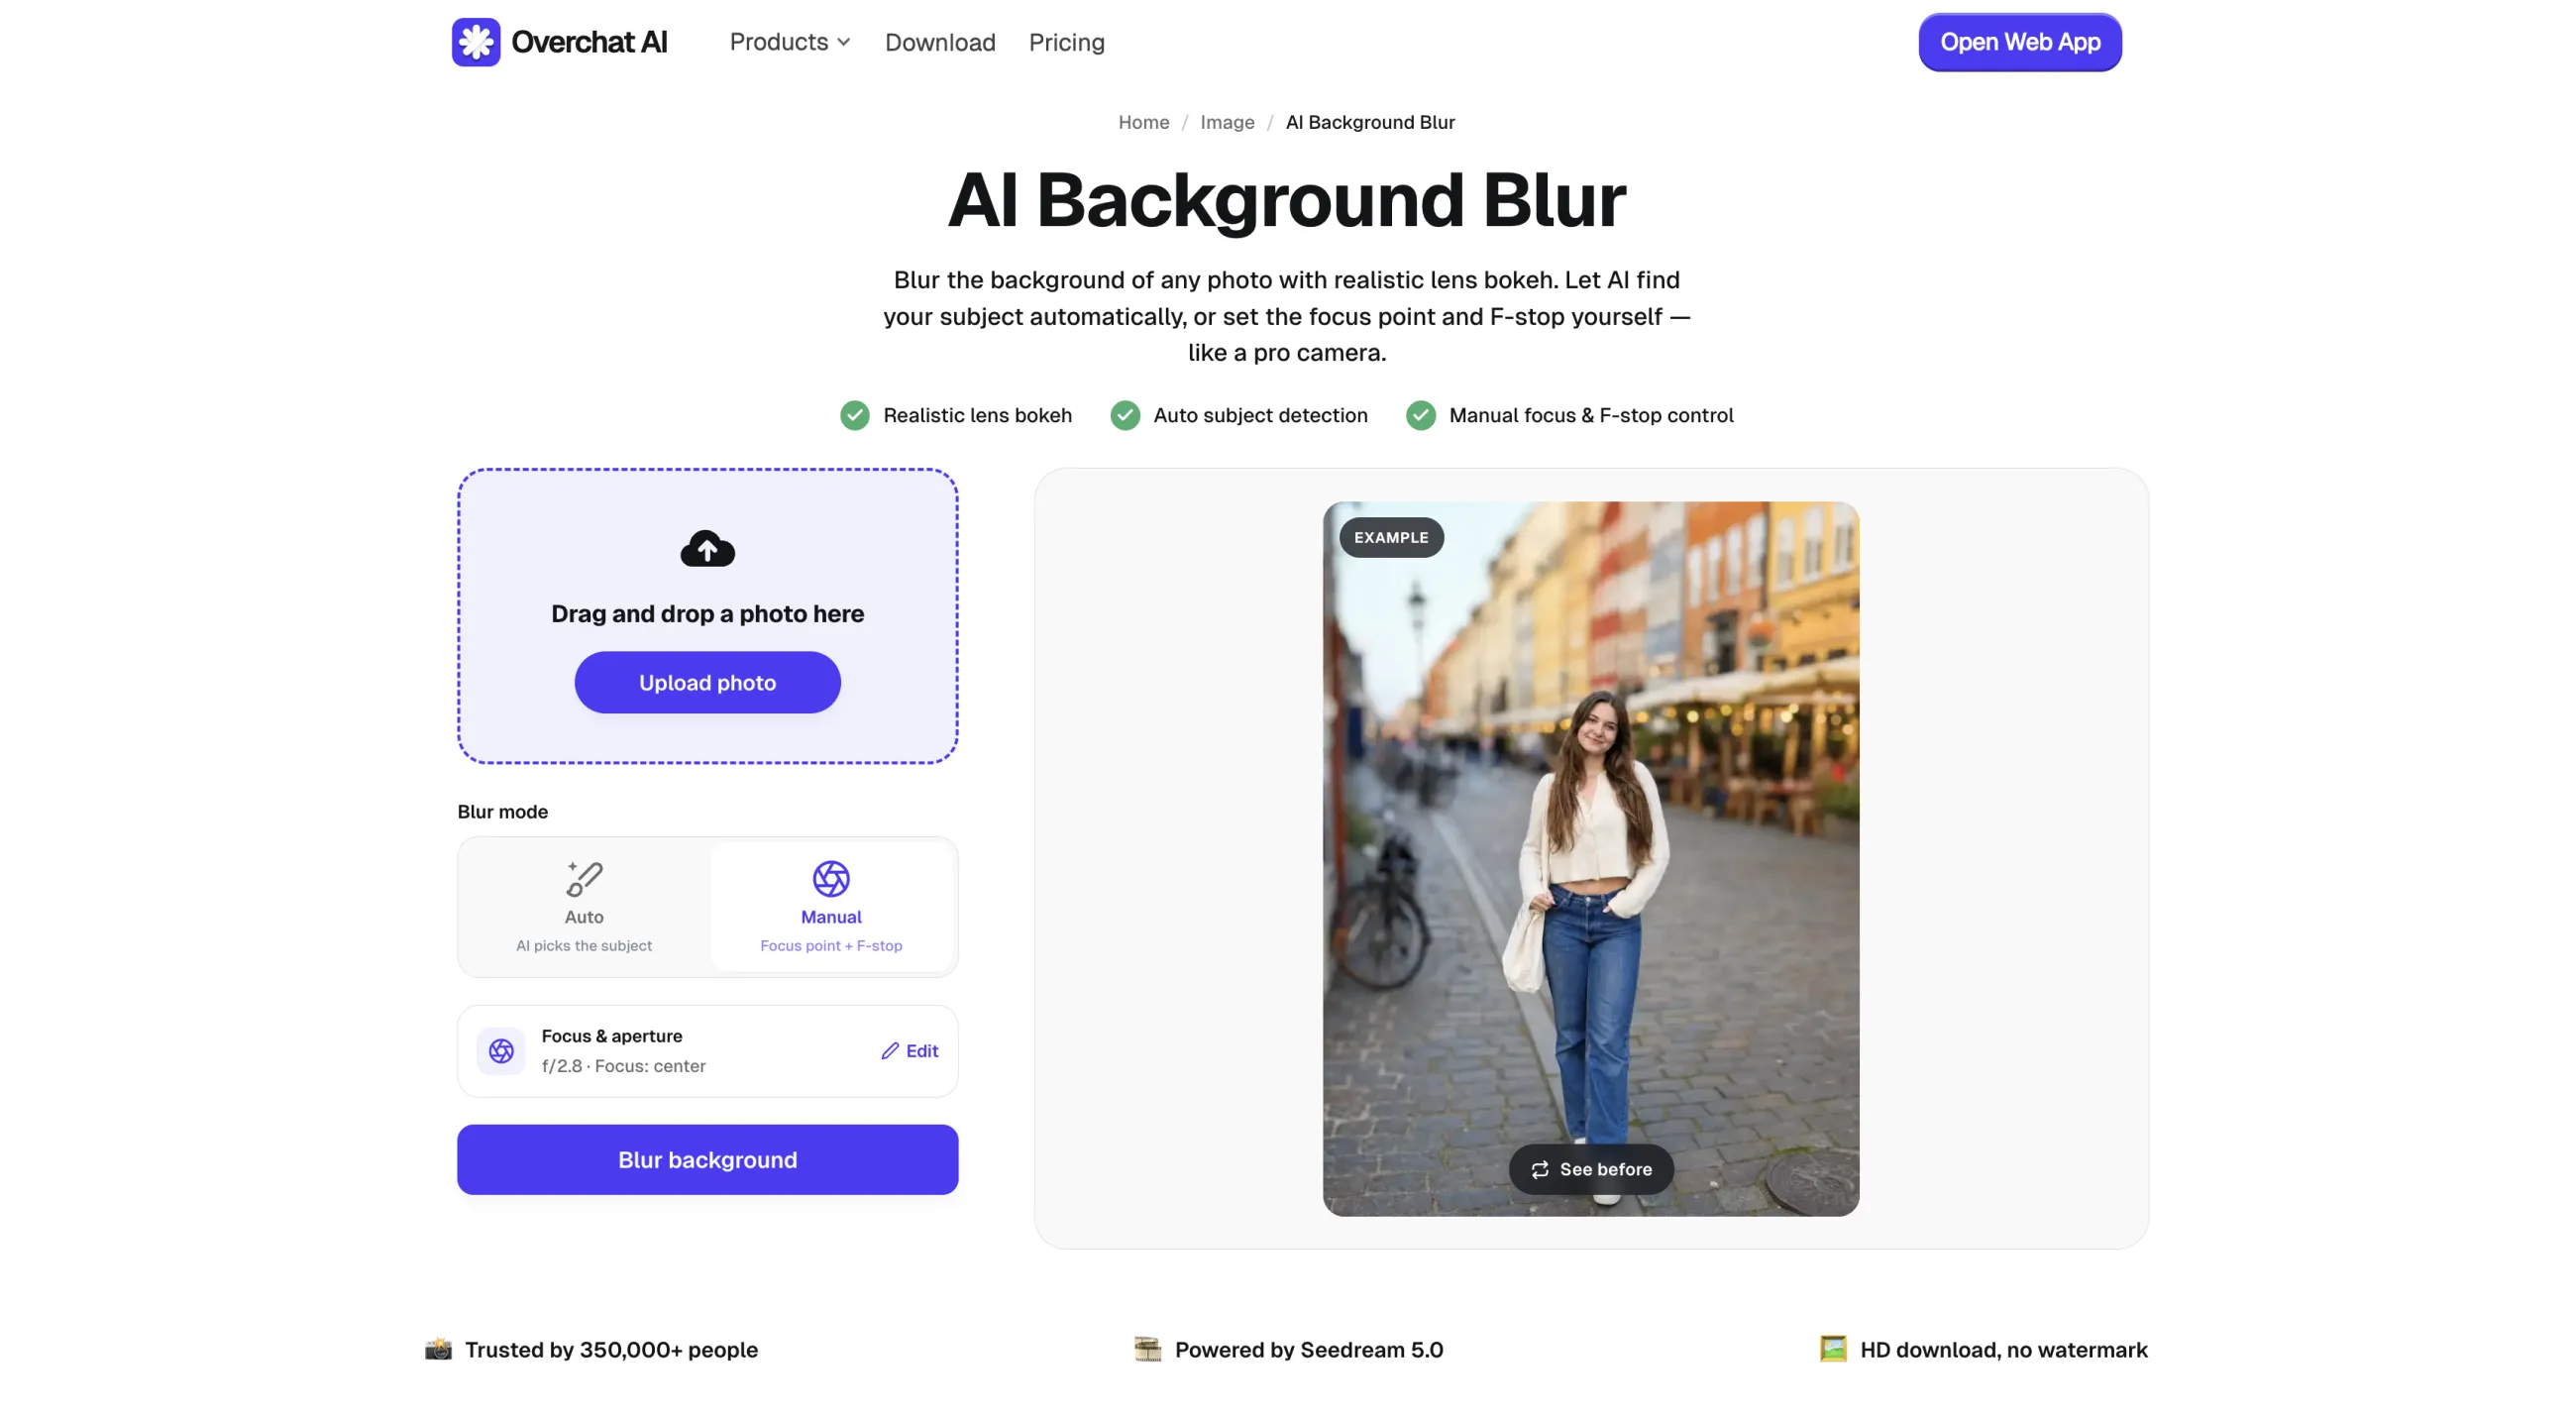
Select Auto if you want the tool to identify the subject for you. Choose Manual if you want to control the focus point and aperture yourself. For this example, we'll use Manual.
Choose Manual to control the focus point and F-stop.
3. Upload your image
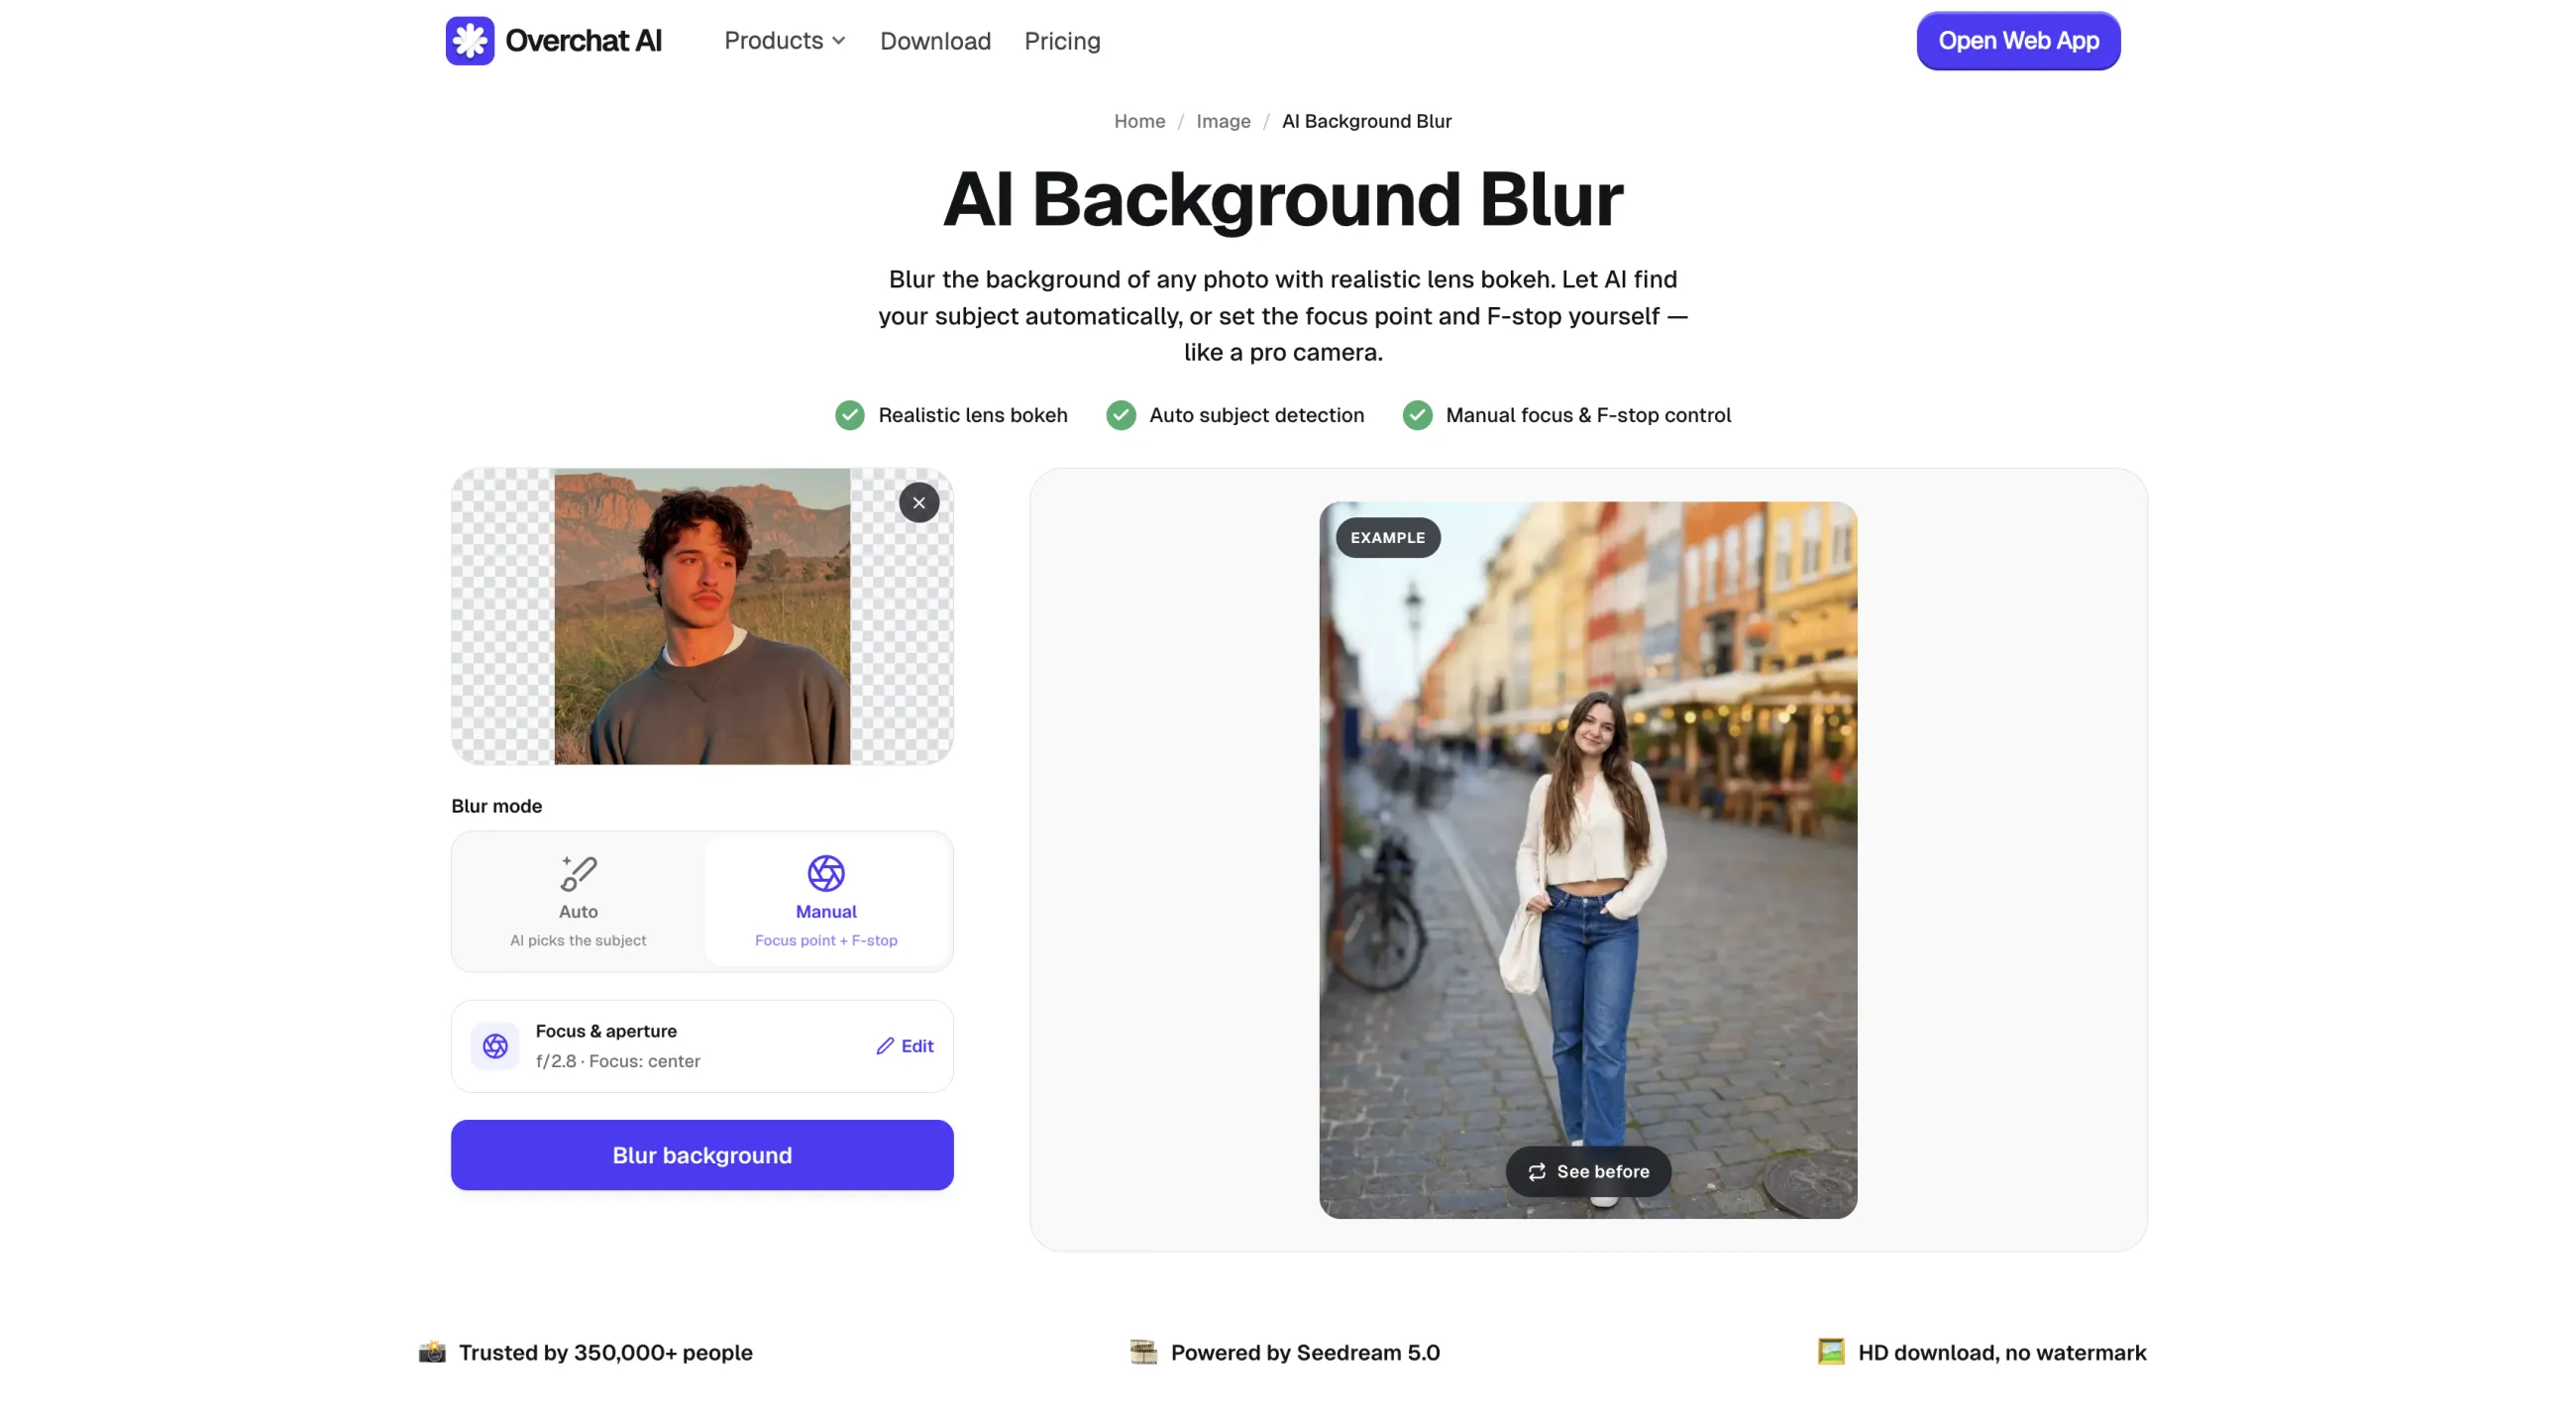
Drag a photo into the upload area, or select Upload photo and choose a file from your device. Once the upload is complete, a thumbnail of the source image will appear in the editor.
Upload the image whose background you want to blur.
4. Open the focus and aperture settings
In Manual mode, select Edit in the Focus & aperture panel. A larger preview will open with a focus marker and an aperture slider.
The default focus point may appear near the center of the image. Check that it sits on your intended subject, especially if the subject is off-center or the image contains several objects at different distances.
5. Set the focus point and F-stop
Click or tap the part of the image that must remain sharp.
For a portrait, place the focus point on the face or eyes.
For a product image, place it on the product itself or on the label if the text needs to remain readable.
Next, adjust the aperture slider:
f/1.4–f/2 creates a narrow area of focus and a strong background blur.
f/2.8–f/4 gives a more moderate portrait-style effect.
f/5.6–f/8 preserves more context around the subject.
f/11–f/16 keeps most of the scene sharp.
Lower F-stop values produce more blur, and higher values produce less.
Select Done when the focus point and aperture are set.
6. Process the image
Press or tap Blur background. The tool will scan the composition and generate the edited image. Processing usually takes about 30 seconds, although the exact time can vary.
Do not close or refresh the page while the progress indicator is active.
7. Review and download the result
If you're happy with the result, select Download to save your photo.
You can also copy or share the image from the result panel. If the wrong area is sharp, move the focus point and run the edit again. If the effect is too strong, use a higher F-stop; if it is too weak, use a lower one.
When should you use background blur?
Background blur is most useful when it supports the purpose of the image rather than becoming the main effect. Common applications include:
Portraits with a busy street, room, or event space behind the subject.
Product images where shelves, furniture, or other objects compete for attention.
Profile photos and headshots that need a cleaner visual hierarchy.
Pet photos with an uneven or cluttered background.
Social posts where text or interface elements will be placed around the subject.
Blur is less suitable when background details are necessary to explain the setting, document an event, show a property, or provide evidence. In those cases, use a subtle setting or leave the background sharp.
FAQ
Quick answers to the most common questions about blurring photo backgrounds with AI.
Can I blur the background of a photo after taking it?
Yes. You can blur the background of an existing photo with an AI background blur tool, even if the image was not taken in Portrait mode.
The tool analyzes the photo, identifies the main subject, and estimates the relative depth of the scene. It can then keep the subject in focus while applying stronger blur to areas farther from the focus point. This makes it possible to create a shallow depth-of-field effect after the photo has already been taken.
How does an AI background blur tool work?
An AI background blur tool analyzes the subject and depth of a photo before applying blur. Instead of blurring the entire background equally, it can vary the amount of blur based on the estimated distance from the focus point.
This helps produce a more natural depth-of-field effect, where the subject stays sharp and distant areas become progressively softer. The result can resemble the background separation created by a wide-aperture camera lens.
What is the difference between Auto and Manual background blur?
Auto mode detects the main subject automatically and applies background blur around it. Manual mode lets you choose the focus point and adjust the simulated F-stop yourself.
Auto mode is useful when the subject is clear and well separated from the background. Manual mode gives you more control when there are several people or objects in the photo, when the tool selects the wrong subject, or when you want to control exactly where the image appears sharp.
What F-stop should I use for background blur?
Lower F-stop values create stronger background blur, while higher values keep more of the image in focus.
As a general guide:
f/1.4–f/2: strong background blur and shallow depth of field
f/2.8–f/4: moderate blur suitable for many portraits and product photos
f/5.6 and above: lighter blur with more of the scene remaining clear
The most natural setting depends on the subject, the original photo, and the visual distance between the subject and background. Very strong blur can look artificial when the subject is close to surrounding objects.
What is the best background blur setting for portraits?
For most portraits, a moderate simulated aperture such as f/2 to f/4 creates noticeable subject separation without making the background look unnaturally soft.
Stronger settings can work well when the background is distant and visually busy. If hair, clothing, or nearby objects begin to show obvious masking errors, reducing the blur usually produces a more convincing result.
Can AI blur the background without blurring the subject?
Yes. AI background blur is designed to detect the main subject and keep it sharp while softening the surrounding areas.
Results depend on how accurately the tool identifies subject boundaries. Fine details such as hair, fur, transparent materials, glasses, foliage, and small objects can be more difficult to separate from the background, so these areas are worth checking before exporting the image.
Does AI background blur reduce photo quality?
AI background blur does not necessarily reduce the sharpness of the subject, but the final result depends on the quality of the original image and the accuracy of the AI depth and subject detection.
Low-resolution photos, heavy compression, motion blur, or unclear subject boundaries can make the effect less precise. For the best result, start with a reasonably sharp image and inspect detailed edges before downloading or exporting the edited photo.
Can I use AI background blur for product photos?
Yes. An AI background blur tool can be used to soften distracting backgrounds in product photography while keeping the product itself in focus.
For products with labels, text, reflective surfaces, transparent materials, or fine edges, moderate blur usually looks more natural than an extreme shallow-depth-of-field effect. Place the focus point on the product or on the detail that needs to remain readable.
Can I blur the background of a photo without Portrait mode?
Yes. Portrait mode is not required if you are applying AI background blur after the photo has been taken.
The tool can estimate the subject and scene depth from a standard image and simulate the background separation normally associated with Portrait mode or a wide-aperture lens.
Is AI background blur the same as Gaussian blur?
No. Gaussian blur applies mathematical smoothing to selected pixels without understanding what is in the image. AI background blur first analyzes the photo to identify the subject and estimate depth.
Because of this, AI blur can keep the subject sharp and apply different levels of softness to different parts of the scene instead of treating the entire background as a single flat area.
What types of photos work best with AI background blur?
AI background blur works best when the main subject is clearly visible and reasonably separated from the background.
Portraits, pet photos, product images, food photography, and photos with a single prominent object are usually good candidates. Images with overlapping subjects, transparent objects, complex hair or fur, or very similar foreground and background colors can be more difficult for automatic subject detection.