How to Make Realistic AI Photos: Prompts, Examples
Last Updated:
2026-06-09
How to Make Realistic AI Photos: Prompts, Examples
AI-generated images have reached a point where they can look almost indistinguishable from real photographs. However, the results depend heavily on the prompt and the model you’re using.
Crafting the right prompt means knowing how to clearly describe what you want to see and using specific keywords that, according to the experience of many AI content creators, tend to produce more realistic results.
With that in mind, let’s go over the 7 essential elements of a good prompt that make AI photos look real — and look at proven examples you can adapt for your own projects.
Seven elements every realistic AI photo prompt should include: subject, scene, lighting, camera settings, camera angle, atmosphere, and quality keywords.
Subject and scene need specifics — "25-year-old woman in a red coat" beats "a woman in red."
Lighting is essential for natural shadows — use real photography terms like Rembrandt, rim, or soft natural light.
Camera settings reintroduce the imperfections our eyes read as real — aperture, shutter speed, ISO, and focal length (85mm portrait, 16mm wide).
The final 10% of realism comes from imperfections like film grain and lens flares — bake them into the prompt instead of editing in post.
7 Key Elements for Creating Realistic AI Photos
To achieve photorealism, every prompt should ideally include seven key elements that describe different aspects of the scene:
They are:
Subject description
Scene description
Lighting
Camera settings
Camera angle
Atmosphere and mood
Keywords
Note: You can sometimes get realistic results without using all of these elements — or even most of them — but that tends to be random and unpredictable, even with top-tier models like Nano Banana or Seedream 4.
If you don’t want to rely on luck, you’ll have to learn how to incorporate these elements. With that said, let’s go over each of them in detail.
1. Subject Description
Your subject description needs to be specific and detailed. Generic descriptions often produce generic results.
Describe age, gender, hair color, clothing style, and facial expression. What to include in subject descriptions:
Physical characteristics — age, build, hair color and style
Clothing details — type of outfit, colors, materials
Expression and pose — smiling, serious, relaxed, tense
Action or activity — standing, walking, holding an object
Examples:
25-year-old woman with long brown hair, wearing a red coat, smiling gently" is far more effective than "a woman in red.
Athletic man in his 30s, wearing a gray suit, standing confidently with arms crossed creates a clear mental image.
2. Scene Description
Scene description establishes the environment and context around your subject — where is this taking place, what objects are visible, and how is the space arranged?
Elements of a strong scene description:
Location type — indoor, outdoor, urban, rural, natural
Background details — furniture, architecture, landscape features
Foreground elements — objects that add depth
Spatial relationships — how elements are positioned relative to each other
Examples:
Modern minimalist office with floor-to-ceiling windows, white desk, and potted plants
Crowded Tokyo street at night with illuminated storefronts and pedestrians carrying umbrellas
3. Lighting
Without clear lighting instructions, the AI often struggles to create natural shadows and highlights — both of which are essential for realistic images.
Professional photographers use different lighting setups to convey mood, and you’ll want to capture that same effect in your prompts.
Common types of lighting include:
Rembrandt lighting
Rim lighting
Butterfly lighting
Natural lighting
Hard and soft lighting
High-key and low-key lighting
How to specify lighting in prompts:
How to specify lighting in your prompts:
Define the light type — soft and diffused or hard and direct
Specify the light source and direction — e.g. “morning sunlight coming from a left window”
Include color temperature — warm golden tones or cool blue undertones
A studio spotlight with defined shadows adds strong contrast and drama.
4. Camera Settings
Unless you’re viewing a scene in person, you’re almost always seeing it through the lens of a camera.
Every camera and lens combination introduces its own characteristics — like depth of field, noise, distortion, and perspective — which our eyes have learned to associate with real photographs, even if we don’t consciously notice them.
Without these subtle imperfections, images can look too clean and artificial, falling into the uncanny valley. Including camera settings in your prompts helps reintroduce those natural photographic traits.
Key camera settings to include:
Aperture — controls depth of field (e.g. “f/1.8” for a blurred background, “f/11” for sharp focus throughout)
Shutter speed — affects motion blur (e.g. “fast shutter speed” for frozen action, “slow shutter speed” for motion trails)
ISO — influences image clarity and grain (e.g. “low ISO 100” for crisp details, “high ISO 3200” for a grainier, low-light look)
Lens: controls perspective. Defined in mm. A 300mm lens creates a telephoto perspective with a narrow field of view, while a 16mm creates a zoomed-out landscape shot, where perspective is exaggerated: closer objects appear larger than they are, while far-away objects appear smaller than they are.
Examples:
Shot at f/2.0 with shallow depth of field keeps your subject sharp while softly blurring the background.
Fast shutter speed, ISO 100 produces a crisp, clean image with no motion blur.
Shot using a 85mm portrait lens
5. Camera Angle
The camera angle determines the viewer's perspective and can dramatically change how the subject is perceived.
Different angles create different emotional responses — a low angle can make subjects appear powerful, while a high angle can make them seem vulnerable or small.
Common camera angles:
Eye level — natural, neutral perspective
Low angle — looking up at the subject
High angle — looking down at the subject
Bird's eye view — directly from above
Dutch angle — tilted for dynamic tension
Examples:
Eye-level shot of a woman standing in a park
Low-angle view looking up at a skyscraper emphasizes height
6. Atmosphere and Mood
Atmosphere ties all the visual elements together and gives your image emotional depth.
Descriptive words about mood help the AI understand not just what the scene looks like, but how it should feel.
How to set atmosphere in prompts:
Use mood descriptors — serene, energetic, melancholic, vibrant
Include weather conditions — foggy, sunny, overcast, rainy
Specify time of day — dawn, midday, dusk, midnight
Serene forest scene with muted colors and soft morning mist creates a calm, peaceful mood.
High-energy urban street with vibrant neon lights and rain-slicked pavement" delivers dynamic intensity.
7. Keywords
Keywords are specific terms that guide the AI toward photorealism. These are words that experienced creators have found consistently produce better, more realistic results.
Think of keywords as quality modifiers that tell the AI exactly what level of detail and realism you're aiming for.
Essential keywords for realism:
Resolution terms — 4K, 8K, high resolution, ultra detailed
Camera-specific terms — DSLR, professional photography, RAW photo
Texture descriptors — detailed skin texture, fine details, realistic materials
Examples:
4K resolution, photorealistic, sharp focus
Professional photography, natural lighting, realistic skin texture
Bonus: Negative Prompts
Negative prompts tell the AI what to avoid. They're just as important as your main prompt because they prevent common AI artifacts and mistakes. Using negative prompts helps you eliminate unwanted elements and maintain consistency across your generated images.
Step-by-Step Guide: How to Make Realistic AI Photos
Now that you understand the core elements, let's walk through the actual process of generating realistic AI photos from start to finish.
1. Choose Your AI Image Model
Not all AI image generation models are created equal, and you’ll have a much tougher time getting realistic results from something like Flux Schnell, compared to a better model, such as Nano Banana.
2. Write a Detailed Prompt
Combine the six key elements we covered earlier into a single prompt. A strong prompt structure looks like this:
If the results don't match your vision, adjust your prompt and regenerate.
3 Realistic Photo Prompt Examples
These proven prompts demonstrate how to combine all the elements effectively. You can use them as-is or adapt them to your specific needs.
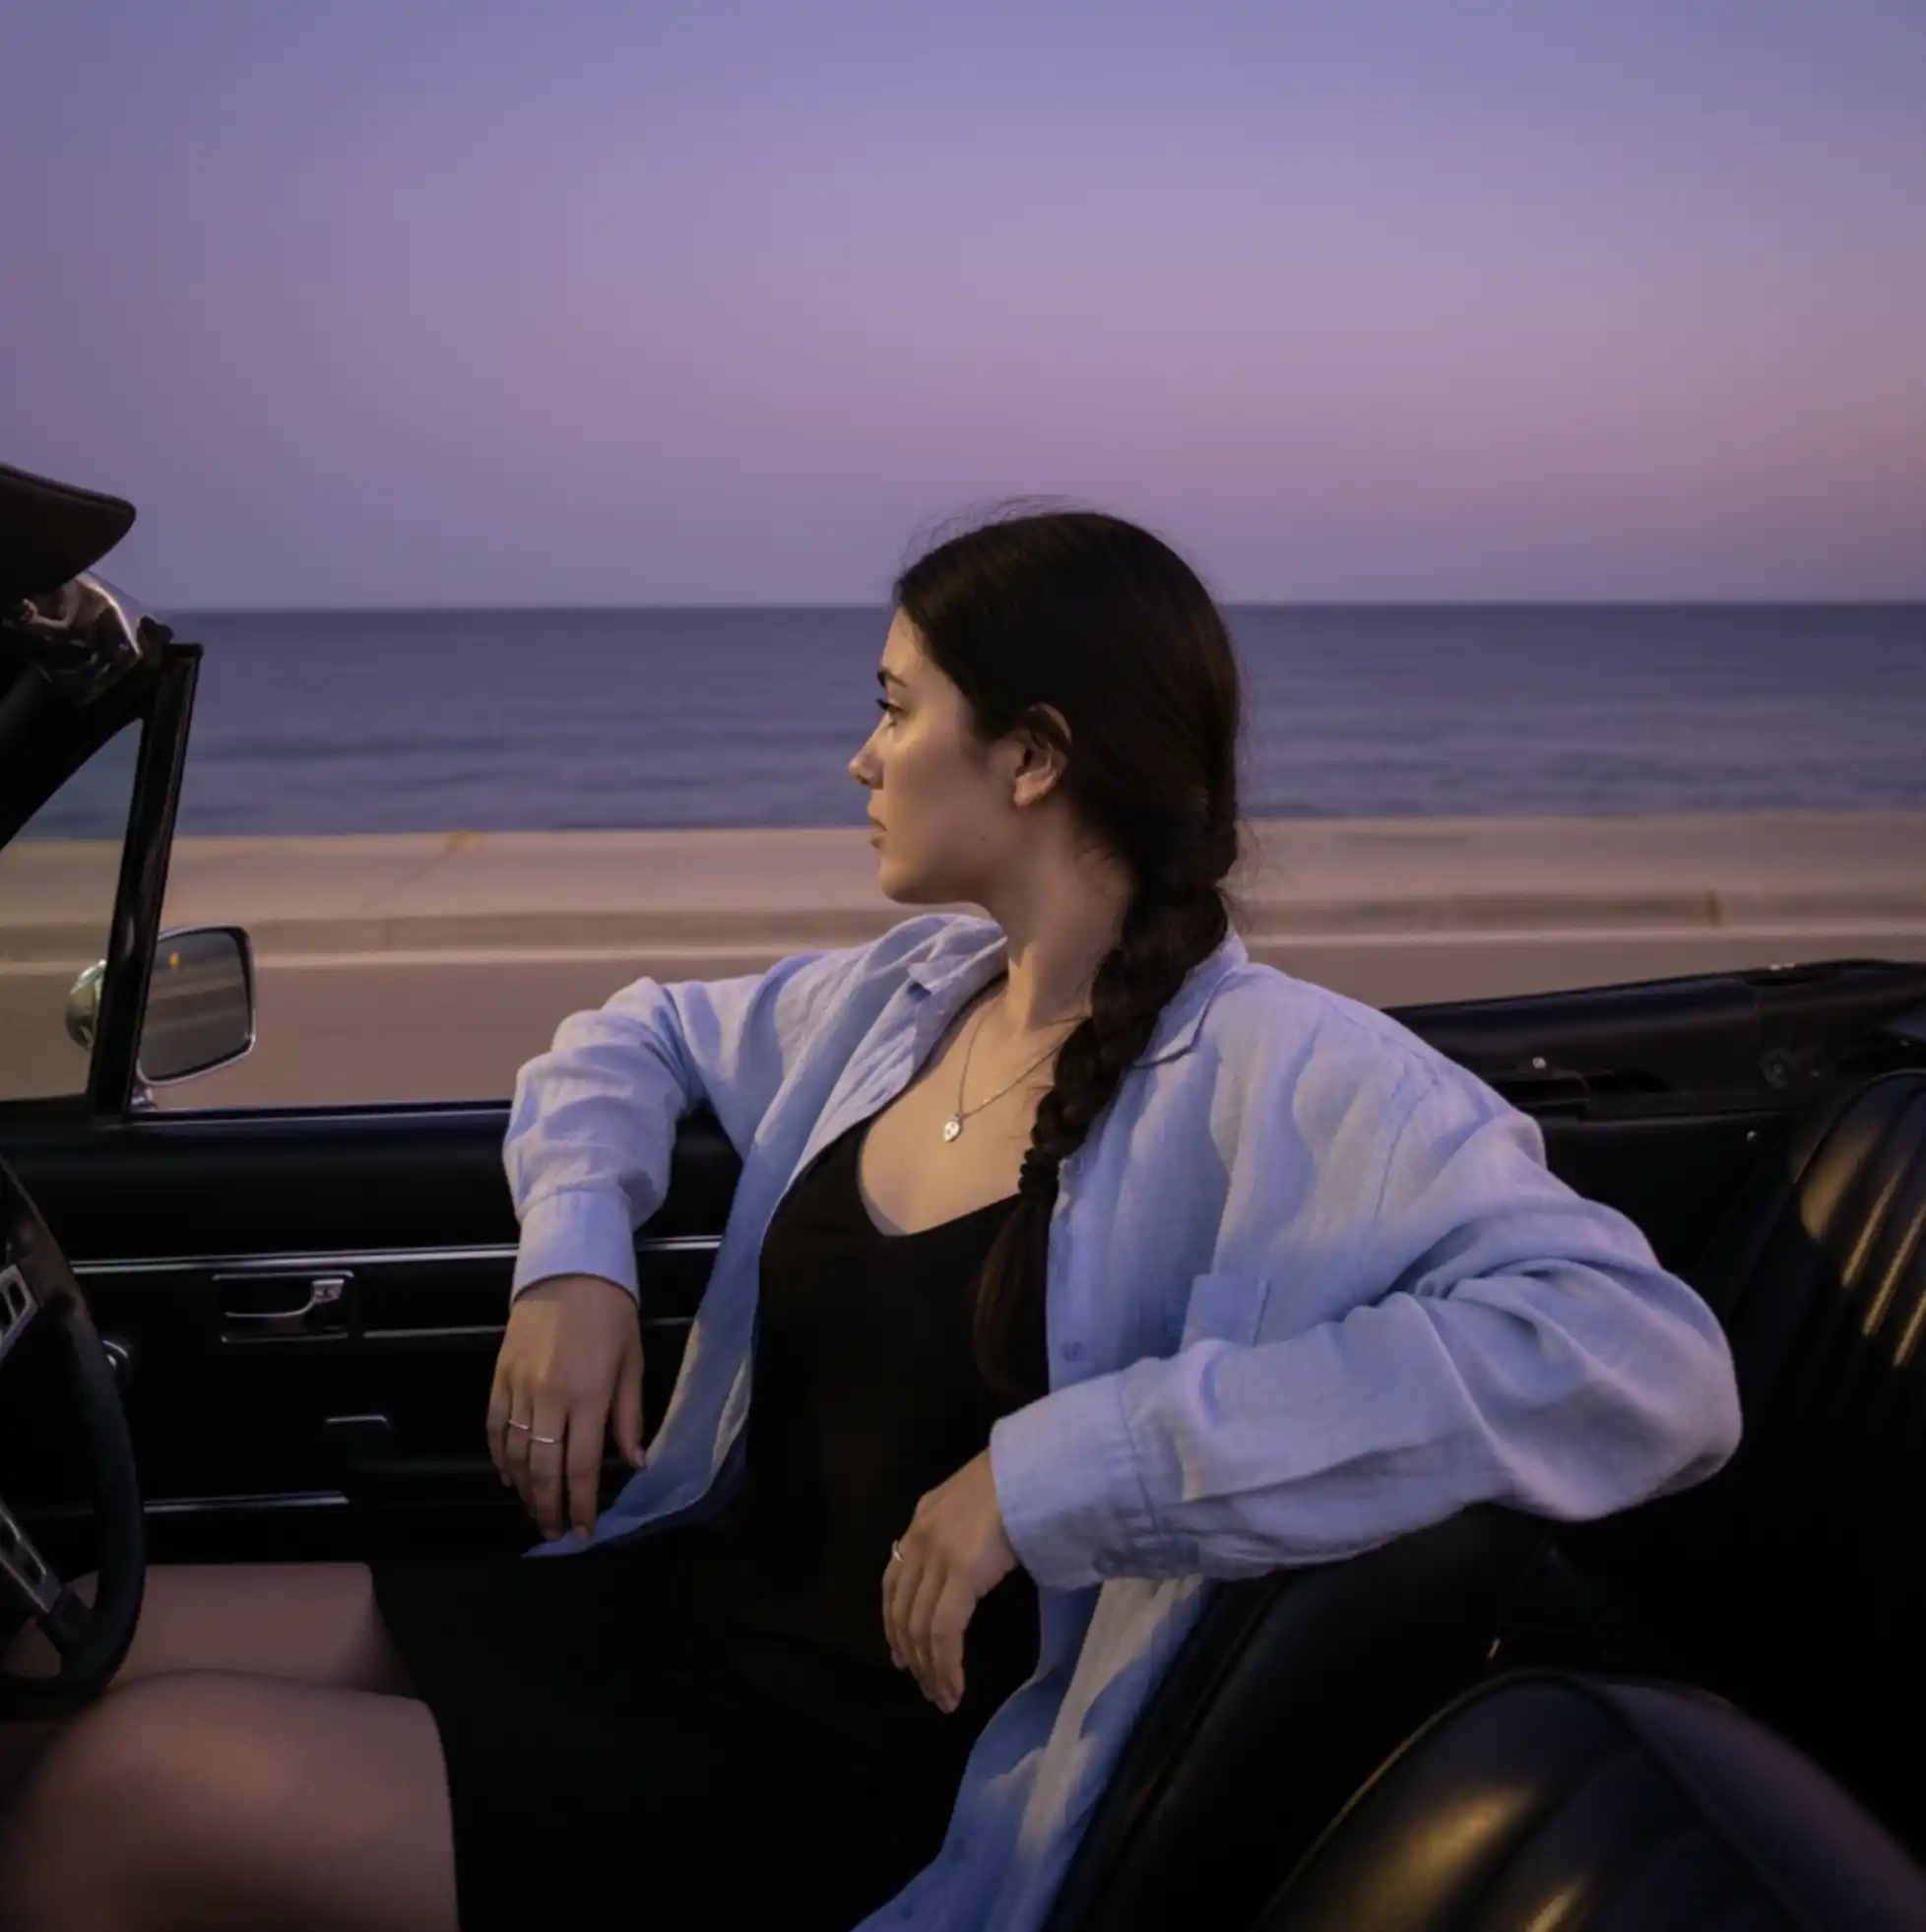
Example 1
Result:
Prompt: Amateur smartphone photo, candid shot of a young woman sitting in the passenger seat of a convertible car parked by the ocean, looking toward the horizon, wearing a loose light blue shirt over a black dress, hair tied back in a casual braid, minimal jewelry, nighttime scene with a deep purple-tinted sky fading into the horizon, soft moonlight and subtle street lighting casting gentle highlights on her skin and clothes, calm dark ocean in the background, crisp sharp focus across the entire frame, no blur, taken like an iPhone photo without professional effects, realistic colors, lifestyle aesthetic.
Example 3
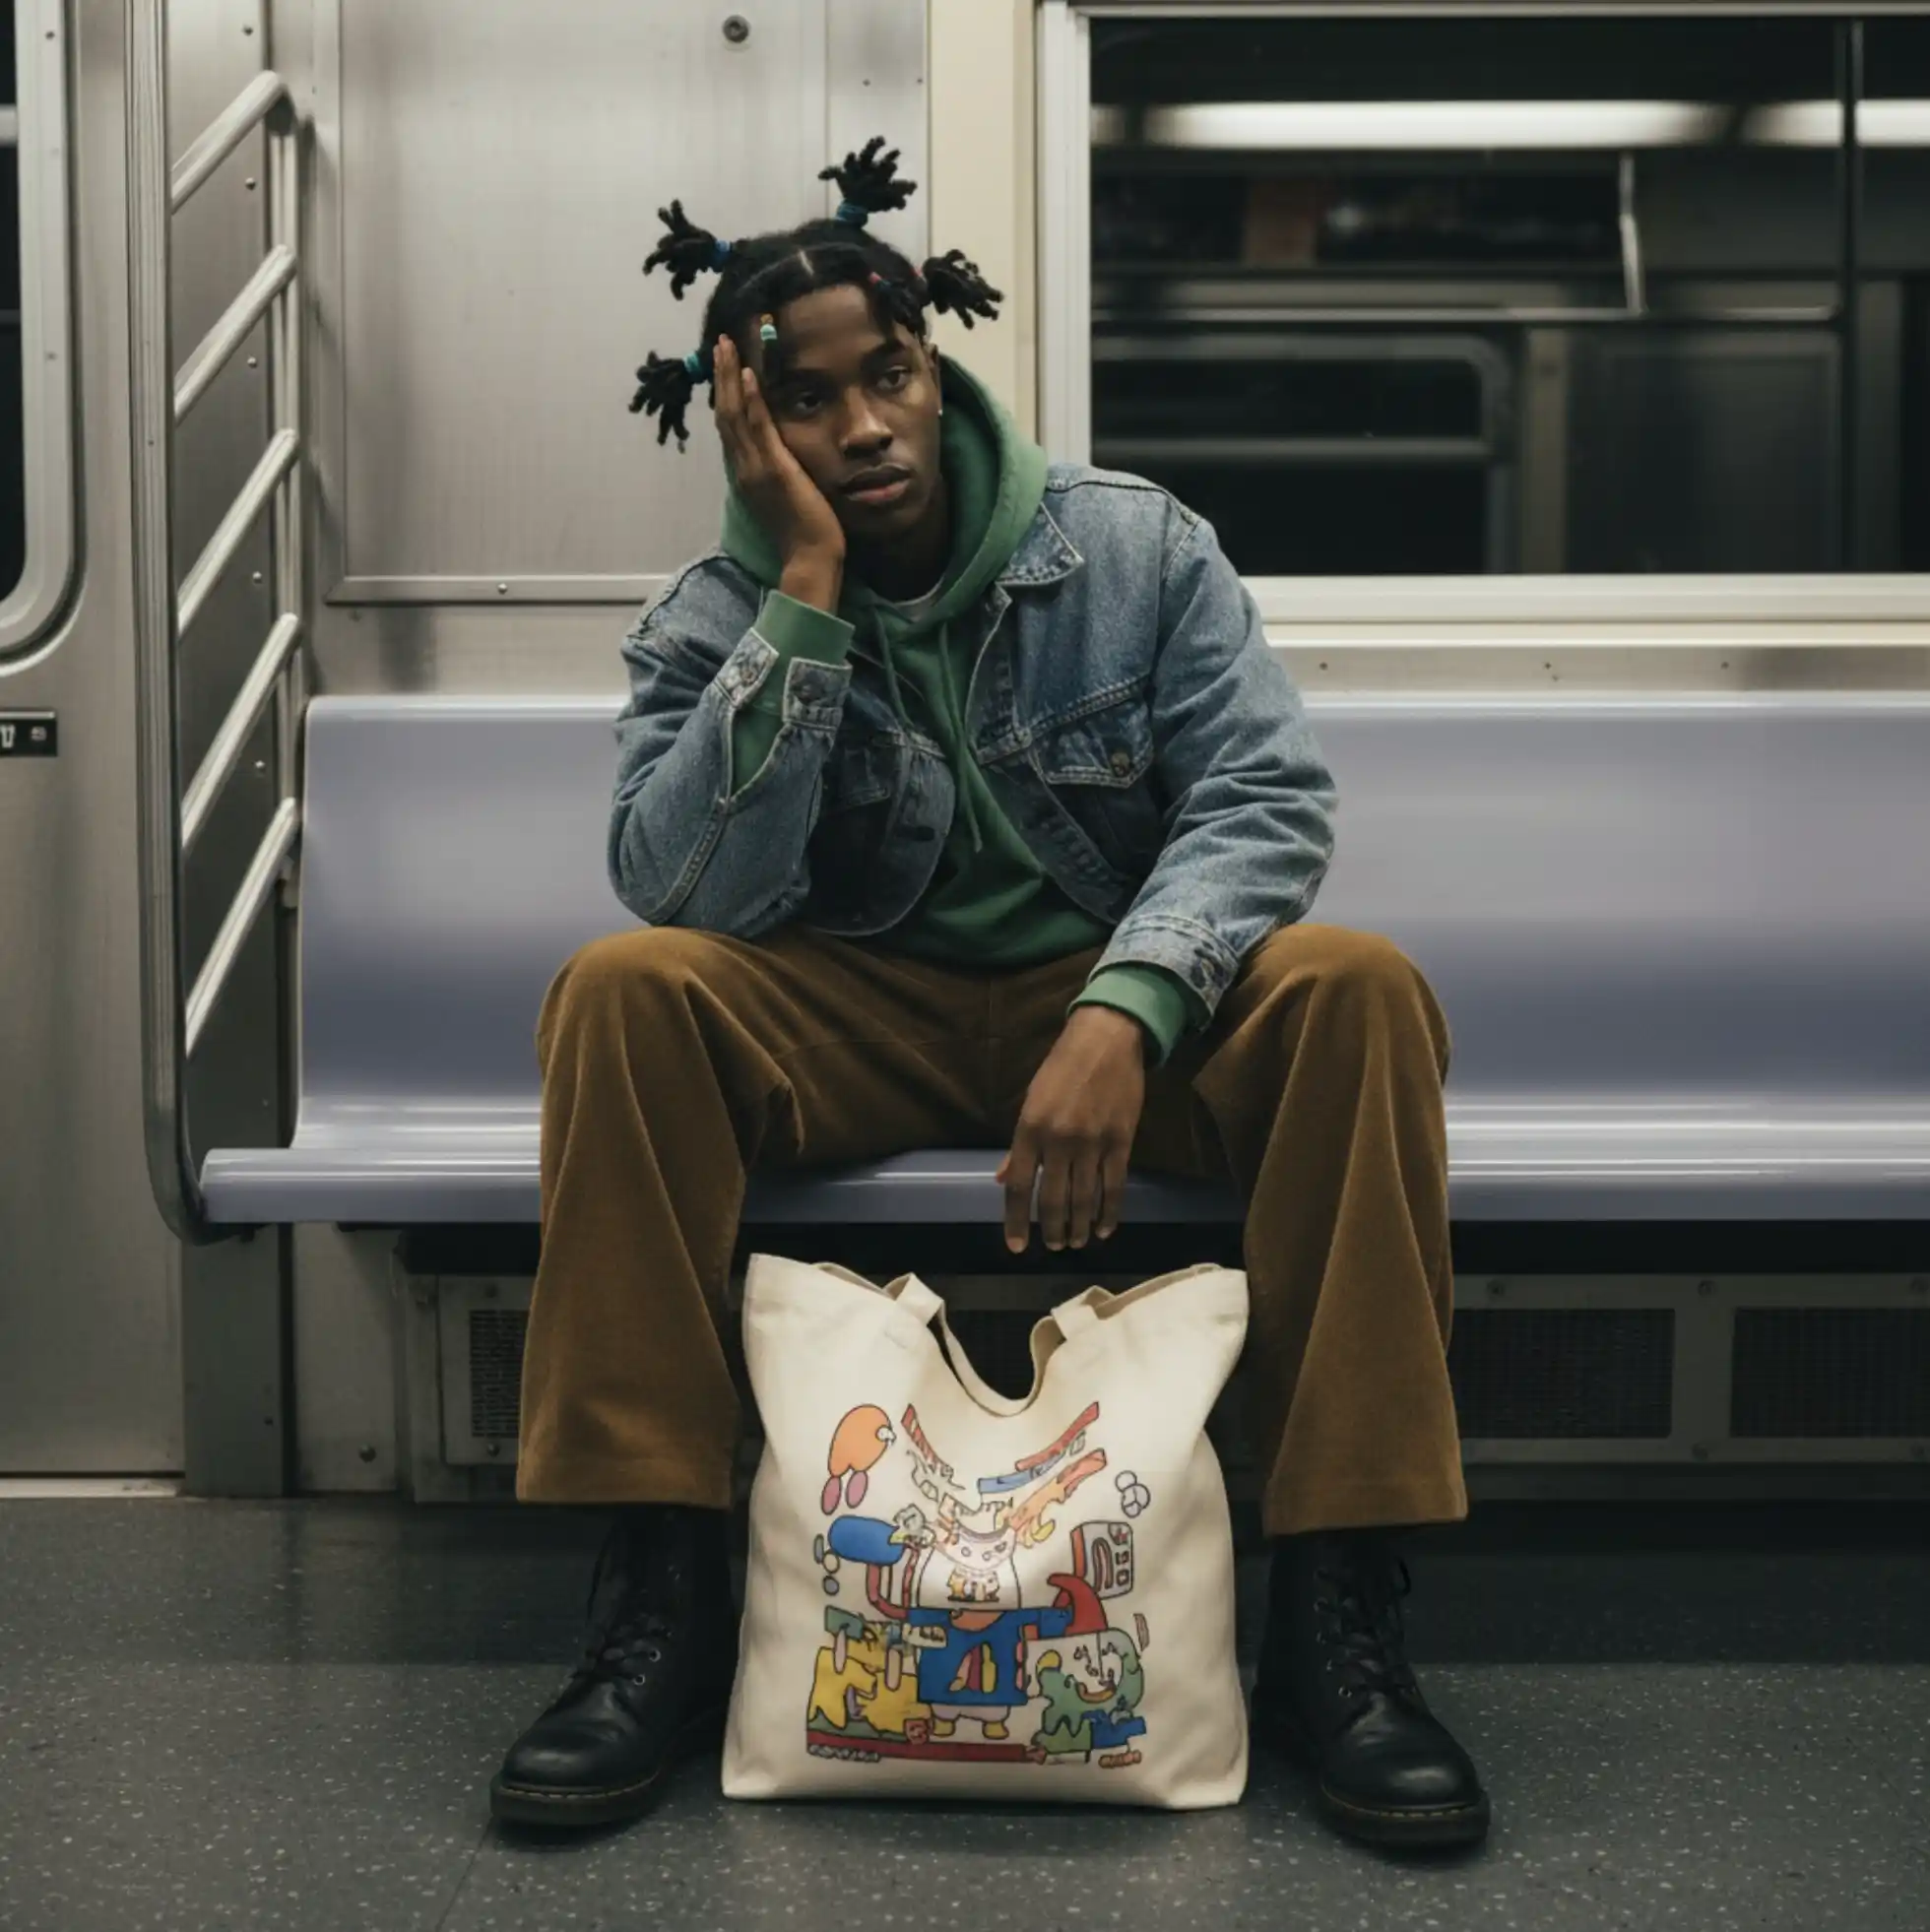
Result:
Prompt: A young man is sitting on a metallic subway bench inside a train carriage, leaning his head on his hand with a thoughtful, slightly bored expression. His outfit: oversized blue denim jacket layered over a green hoodie, paired with loose brown corduroy pants and black lace-up combat boots. His hair is styled in multiple afro-puff ponytails with a casual, playful look. In front of him on the floor is a large canvas tote bag with a colorful cartoon-style graphic design. The subway environment includes silver walls, soft purple-gray seating, and fluorescent overhead lighting that creates a muted, urban atmosphere. The photo feels spontaneous and authentic, emphasizing textures of denim, corduroy, and fabric details. The overall mood is stylish, youthful, and urban editorial with a candid snapshot aesthetic.
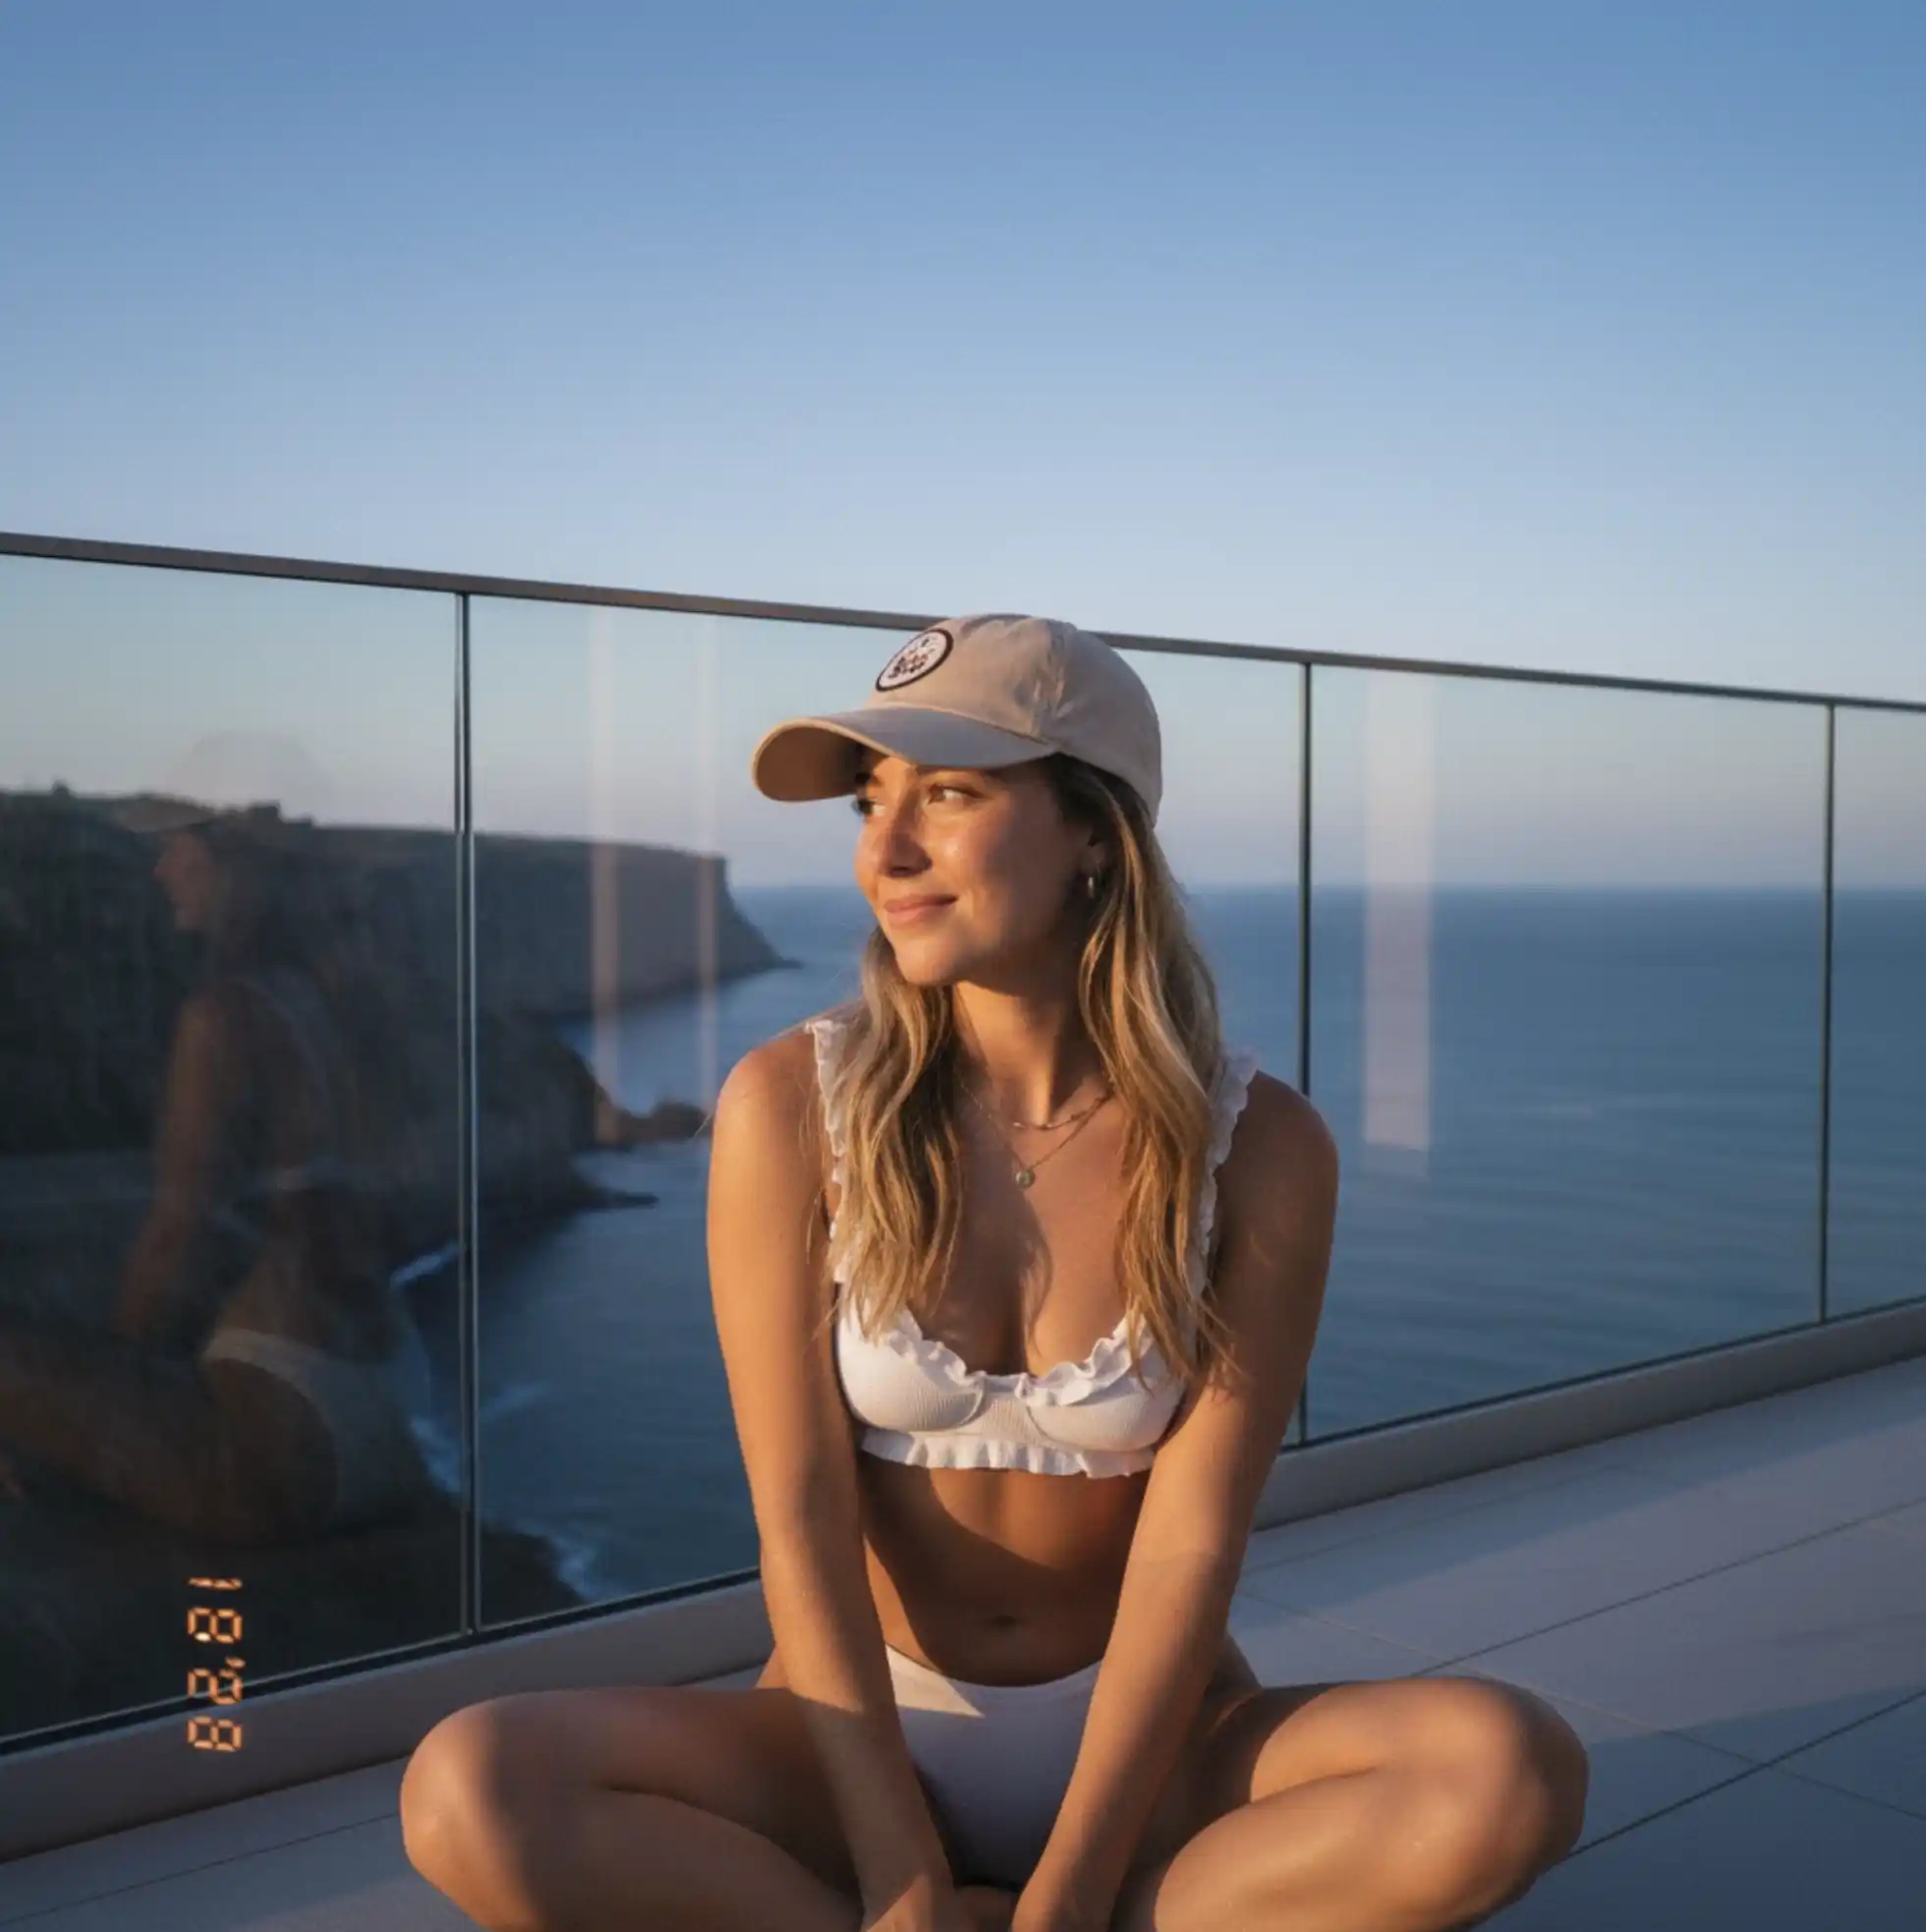
Example 3
Result:
Prompt: Photorealistic smartphone photo, candid portrait of a young woman sitting cross-legged on a modern balcony deck with glass railing above the ocean cliffs at blue hour, gentle smile, subtle sun-kissed skin, long slightly wavy hair with soft highlights, white ruffled bikini, beige baseball cap with small round patch, delicate jewelry, natural skin texture with tiny reflective droplets, warm-cool color contrast, soft directional light from the horizon, shallow phone-lens depth of field, slight film grain, clean HDR look, realistic perspective lines on the railing, faint orange date stamp aesthetic near the bottom left, no logos, no text, RAW look, high detail, editorial yet casual, composed like an iPhone 15 Pro 26mm 1.8 shot, rule of thirds framing, horizon straight.
FAQs
What makes an AI photo realistic?
Realistic AI photos have accurate lighting with natural shadows and highlights, correct proportions and anatomy, detailed textures that mimic real materials, and proper depth of field. The key is including specific technical details in your prompt — like camera settings, lighting direction, and resolution keywords — that guide the AI toward photorealism rather than stylized or artificial-looking outputs.
How does AI create realistic photos?
AI image generators use deep learning models trained on millions of real photographs. They learn patterns, textures, lighting behaviors, and spatial relationships from this training data. When you provide a detailed prompt, the AI combines these learned elements to generate new images that statistically resemble real photos, even though they're entirely synthetic creations.
What are the best prompt techniques for realism?
The most effective technique is combining all six key elements: subject description, scene description, lighting details, camera settings, camera angle, and atmosphere. Include technical photography terms like "f/2.8," "shallow depth of field," and "soft natural lighting." Add quality keywords like "photorealistic," "4K resolution," and "DSLR quality." Always use negative prompts to exclude unwanted artificial elements.
Bottom Line
Creating realistic AI photos ultimately comes down to writing detailed prompts. When it comes to realism in AI art, the more precisely you describe your subject and scene, the more detailed and lifelike your results will be — and that detail is what our eyes interpret as realism.
The remaining 10% comes from post-processing — things like film grain, lens flares, and subtle imperfections. But you don’t need Photoshop to add these effects; you can include them directly in your prompt by using the right keywords and camera settings.
All in all, by combining these elements, you’ll be able to generate ultra-realistic AI images with ease.